
Time inexorably carries us forward, but there are technological artifacts of the past that you remember with warmth. One such prime example is Hiren’s BootCD, a legendary CD that was passed around and cloned onto dozens of CD-Rs back when computers were an integral part of our daily lives but still required regular manual tuning and repair. CDs are a thing of the past, replaced by other media. Hiren’s BootCD has undergone some changes, but is still useful and ready to come to the rescue. Today we will talk about how to create Hiren’s Boot USB.
What is Hiren’s BootCD and how is it useful?
Hiren’s BootCD is a collection of programs specially created as an emergency kit in case of unexpected situations with the computer. Modern Hiren’s BootCD PE is an updated variation of the popular Hiren’s BootCD kit, redesigned and expanded to be compatible with the 64-bit Windows 11 PE preinstallation environment. This rework is carried out by Hiren supporters and enthusiasts since official updates stopped in 2012. The reason was that many of the included programs were commercial products with certain copyrights. The package used either outdated or free versions of these programs, and the lack of necessary licenses raised questions about the legality of distribution of this collection. With the tightening of licensing requirements and copyright regulations, implementing the latest software updates without violations has become problematic.
In this regard, the launch of new versions of Hiren’s BootCD inundefined in accordance with licensing agreements has become not only unprofitable from an economic point of view, but also associated with legal risk for the creators. The user community continued to unofficially revive and modify Hiren’s BootCD, resulting in various alternatives, including Hiren’s BootCD PE (Preinstallation Environment), which is based on Windows PE and includes tools that operate within legal licensing boundaries.
What tools are included in the updated Hiren’s Boot CD?
Hiren’s BootCD PE contains a wide range of tools and applications designed for error analysis, PC repair and maintenance. Below is a list of some assembly items typically found in Hiren’s BootCD PE:
1. MiniTool Partition Wizard
A utility for manipulating sections on a disk, allowing you to adjust their size, design new ones, format and delete existing ones.
2. Lazesoft Recovery Suite
An omnibus of tools for recovering lost information, restoring access to passwords and rehabilitating the entire operating system.
3. Malwarebytes Anti-Malware
A tool for identifying and eliminating malicious programs and infected files.
4.Recuva
Software that can recover erased files from hard drives, memory cards and peripheral devices.
5. CCleaner
A program for removing unnecessary files from the system and improving its performance in the Windows operating system.
6. CPU-Z
Detailed display of information about hardware componentsundefined PC including CPU, RAM and base board. 7. SumatraPDF
Compact application for viewing PDF files.
8.TeamViewer
System for remote monitoring and control of computers via a network.
9. 7-Zip
A significant archiver that supports a wide range of data formats.
10. BCMFR (Backup and Restore Windows)
A device for copying data in case of data loss and further verification recovery in Windows.
These tools, along with many others, make Hiren’s BootCD PE a valuable tool arsenal for IT professionals and computer troubleshooters. Please note that the list of utilities is updated periodically and may vary in different collections.
How to create Hiren’s Boot CD on a bootable USB drive?
Prepare a flash drive with enough memory to store files, preferably at least 4 GB.
Now we need to download Hiren’s BootCD PE ISO image to create a USB bootable drive. To do this, go to the assembly site in the “Downloads” section.
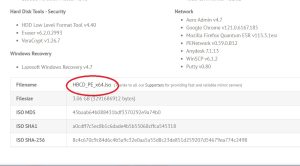
Download the posted Hiren’s Boot ISO file.
The next step is to create bootable media.
We will create a bootable usb using the example of two programs (YUMI and Rufus). Each of them gets the job done, we’ll show you the capabilities of both, and it’s up to you to decide which one to choose.
Creating Hiren’s Boot flash drive with YUMI
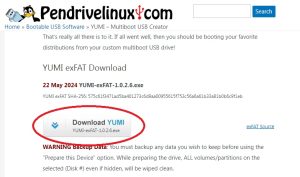
Go to the official YUMI website and download the latest version of the program.
Start installing the program as an administrator by right-clicking on the installation file shortcut and clicking “Run as Administrator.”
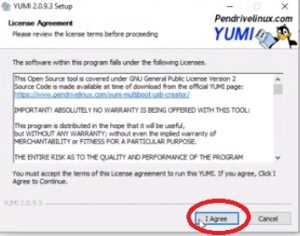
Connect your USB drive to a free port. When you begin installation, agree to the license and terms of use of the software.
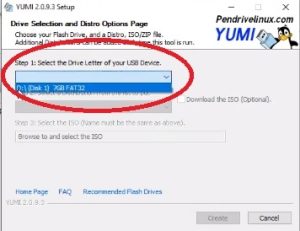
Select your USB drive from the list of devices.
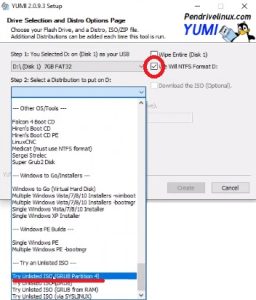
Check the box on the right to confirm formatting in NTFS and select “Try Unlisted ISO (Grub Partition 4)” from the list.
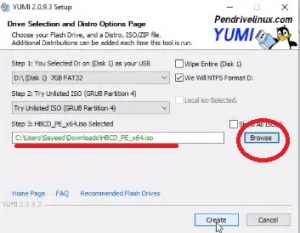
Select Hiren’s BootCD PE ISO Image Click “Create”
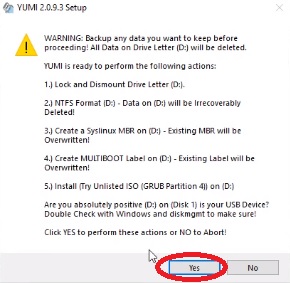
A pop-up notification will alert you that the data on your drive will be erased and the drive itself will be converted.
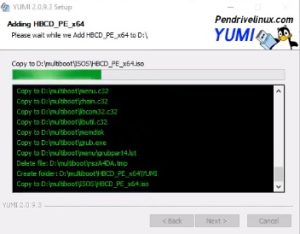
The creation of a bootable flash drive with Hiren’s BootCD PE has begun
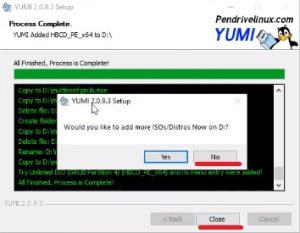
When the process ends, a notification pops up about additional recording of the image to this drive. Click No.
Your bootable flash drive is ready.
Don’t forget to remove the USB from the port in a safe way.
Creating Hiren’s Boot USB with Rufus
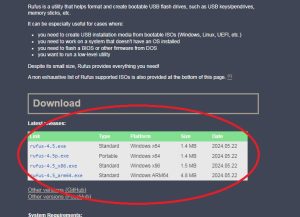
To work, you need to download the latest version of the program.
Go to the software website.
When the download is complete, open the program and insert the flash drive into a free USB port.
When using Rufus, you should enable a specific mode that will allow you to create bootable media that is compatible with both UEFI and BIOS. Pressing the ALT+E key combination initiates the transition to the required “Dual UEFI/BIOS mode” in the Rufus interface.
The connected USB device should be displayed in the program section (Device).
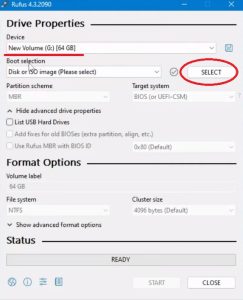
In section (Boot Selection) click on “Select” to select the created ISO image.
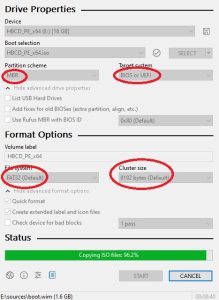
The next step is to select the “Partition Scheme” field, where we just need to select the MBR parameter. In this case, the field on the right will automatically change the value to BIOS (or UEFI-CSM), and the file system parameter below will change to FAT32 as the file system. After that, everything is ready and you can click “Start”
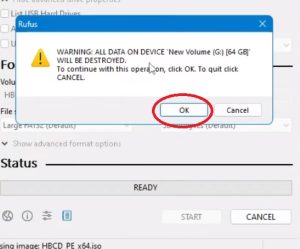
The program will send a notification that all data on the drive will be overwritten and destroyed, and if you forgot something important on your USB, this is the last opportunity to save the data. If everything is in order, then click “OK”.
Rufus will begin creating a bootable flash drive. It does not take a lot of time. At the end of the process, the “READY” status and the “CLOSE” button will appear, and this will complete the creation process.
As you can see from the instructions, creating a bootable USB with Hiren’s Boot is a simple process.
Having such a set of tools on modern media makes it possible to quickly solve many computer problems.