

Software can vary greatly, and the system and hardware requirements it may present differ. For instance, sometimes the system may require enabling Secure Boot – a special protocol embedded in UEFI firmware, designed to verify and analyze drivers and the operating system itself before launch. Many users encounter such a message and look for ways to enable Secure Boot mode.
What is Secure Boot?
Secure Boot is a special security protocol embedded in modern Windows OS. Before launching the operating system, a check of all the digital signatures of the drivers, programs, and components from the manufacturers is initiated.
Simply put, Secure Boot acts like a customs service, conducting a document check and not allowing any suspicious programs and files through, preventing the execution of “unauthorized” code. Thus, its main purpose is to protect the system from malicious software that managed to infiltrate the computer bypassing the antivirus. Secure Boot itself does not load the system in any way, as it operates at a lower software level.
This feature only works in conjunction with the proprietary interface UEFI (Unified Extensible Firmware Interface), which is the modern replacement for the outdated BIOS system. UEFI offers a range of improvements compared to BIOS, including support for Secure Boot. The UEFI Secure Boot feature debuted with the launch of Windows 8 and is also available in Windows 10, 11.
Pros and Cons of Secure Boot
Before enabling Secure Boot, it is important to determine which factors are priorities for your situation. One should know that enabling Secure Boot can have certain consequences for the system and the loading of the operating system. If a high level of security is a key requirement and the use of only signed and verified software is not a problem, Secure Boot will be a significant enhancement to the security of your system. However, if you actively experiment with various software or hardware, Secure Boot may limit your flexibility in these activities.
Pros
- Secure Boot prevents the loading of malicious software at the BIOS level by blocking the launch of unauthorized operating systems and bootloaders that could initiate rootkits and other types of hidden malicious programs.
- Secure Boot helps protect the boot process from computer threats that can attack before the antivirus software is launched.
- If you use the system in an organization that must comply with certain regulatory security standards, enabling Secure Boot may be a requirement.
- In the latest versions of Windows, integrated security features such as Secure Boot may be combined with other security features like Windows Defender for an additional layer of protection.
Cons
- Some older operating systems do not support UEFI or Secure Boot. If you use such systems, they may not boot after switching.
- When Secure Boot is enabled, there may be problems loading hardware or operating systems that do not have EFI signatures. This could be related to some types of solid-state drives or network cards.
- After enabling Secure Boot, there may be issues with loading software that could have been installed in the system without a digital signature. This also applies to device drivers. – In some older systems, it may be necessary to update the BIOS/UEFI firmware to the latest version that supports Secure Boot.
How to check secure boot function in Windows 8,10,11?
As we have already written above, the benefits of Secure Boot become available only in UEFI-compatible systems. In older systems that use only legacy BIOS without UEFI support, the Secure Boot function will not be available. To check whether Secure Boot is enabled on your computer and whether it is supported at all, you can check with 2 methods:
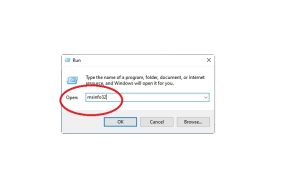
Check through System Information
Access the “System Information” management console using the command msinfo32.
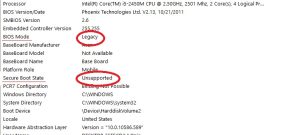
In the root section, locate the “Secure Boot State” entry and check the status indicated there. If protection is active, the status will show “On”;
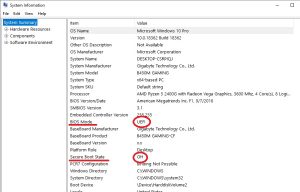
if it is inactive, the status will be “Off”; if Secure Boot is not supported, the status will reflect “Not Supported”.
Check through BIOS
For Windows 8 and 10:
- Open your computer’s settings.
- Navigate to the “Update & Security” section.
- Select “Recovery”.
- Under “Advanced startup,” click on “Restart now”.
- After the reboot, choose “Troubleshoot”.
- Then go to “Advanced options”.
- Select “UEFI Firmware Settings” and click “Restart”.
- Upon entering the UEFI/BIOS settings, find the Secure Boot section and verify its status.
For Windows 11:
- Open “Settings”.
- Go to “System” > “Recovery”.
- In the “Advanced startup” section, click the “Restart now” button.
- Follow the same steps described above for Windows 10.
As you can see, the first method is easier to execute and is just as informative. However, if for some reason you are unable to perform the check through the “System Information,” use the instructions for the second method.
Activating the Secure Boot Feature
Please be aware that the precise steps to access the BIOS/UEFI and locate the Secure Boot option can differ based on your computer or motherboard’s manufacturer and model. Furthermore, the Secure Boot function may not be supported on older computers or systems configured with Legacy BIOS mode.
To enable the Secure Boot feature in Windows 8, 10, 11, follow these steps:
- Restart your computer and, during boot up, there should be a prompt on the screen asking you to press a specific key to enter the BIOS/UEFI, such as Delete, F2, F10, F12, or Esc. Press the corresponding key.
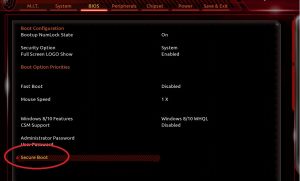
- Within the BIOS/UEFI interface, locate the section related to system booting, which could be labeled “Boot”, “Security”, or “Authentication”. Find the “Secure Boot” setting within this section
- If the Secure Boot option is turned off, alter its status to “Enabled” (On). Do not forget to save the changes in the settings, this is typically done by selecting “Save & Exit”.
Depending on your computer’s make and model, take into account that to enable Secure Boot, you might need to initially configure the “Load Mode” to “UEFI” instead of “Legacy” and disable the Compatibility Support Module (CSM) systems.
Is the Secure Boot Function Implemented in Windows 7?
Although Microsoft has released an update for Windows 7 claiming to add Secure Boot support, users report being unable to fully utilize it on this system, encountering numerous errors due to hardware configuration mismatches. Initially, the Secure Boot feature was not supported by the Windows 7 operating system because it was introduced with UEFI version 2.3.1, which came into use with Windows starting from Windows 8 onward. Secure Boot requires firmware-level support from UEFI, a standard that wasn’t in place at the time Windows 7 was released. Windows 7 was designed to work with the traditional BIOS, not UEFI, meaning there was no native support for UEFI functions, including Secure Boot.
However, some manufacturers do provide UEFI firmware updates that may add indirect support for Secure Boot even on machines running Windows 7 with older hardware. Nevertheless, these additions are implemented through workarounds, and the system still won’t utilize Secure Boot as comprehensively as it is utilized in later Windows releases.