

ВIOS, or the basic input/output system, is an integral component of a personal computer, responsible for its efficient operation. It is this that ensures that the computer boots without problems. Such a system allows interaction between different equipment components. Unlike most software, the BIOS cannot be updated automatically. Therefore, if you experience boot errors or incorrect interaction of components, then updating the BIOS is one of the radical options for solving problems if no other options have worked. This text is devoted to a detailed study of the problem of how to update the BIOS on an MSI motherboard. It may seem to you that this is incredibly difficult and only an experienced specialist can handle it. But don’t worry – follow the instructions below, this will help you solve the problem. First, we’ll find out what the BIOS is and how to decide whether it needs to be updated.
What is BIOS?
Simply put, BIOS is a special firmware program built into the motherboard on your PC. It is responsible for recognizing and interacting with all hardware components that exist on your PC. In addition, the BIOS is responsible for testing before starting the system and the startup itself. BIOS is the intermediary between the operating system (OS) and the devices we use (monitor, keyboard, mouse, hard drive and other equipment). BIOS has its own interface through which a person can interact with many settings. For example, you can change BIOS settings to make your PC run faster, change port addresses, where the operating system boots from, or adjust the temperature by lowering or increasing the fan speed.
So, if you are facing any system problem and have tried all the solutions or want to buy new hardware to improve your PC, you have probably come to the conclusion that you need to update your MSI BIOS to the latest version. Remember, there must be a good reason to upgrade.
When we talk about MSI BIOS, we mean the BIOS firmware of MSI motherboards. It doesn’t really matter whether the motherboard is inside your PC (which is more common) or inside an MSI laptop. The process is essentially the same. Updating the BIOS can be time-consuming and risky, as incorrect steps in the process result in permanent changes. But if you look at it, it is not such a dangerous process, and if you follow the instructions, taking the necessary precautions, there is nothing to be afraid of.
Preparation for Updating MSI BIOS
Before the update process, there are some steps that need to be taken to ensure the security of the installation and prevent data loss:
- First, you need to check which version of MSI BIOS is installed on your system. It may be that your PC already has the latest version installed and the process will be pointless. If this is not the case, look at the latest BIOS version on the manufacturer’s website;
- You need to understand what changes it suggests (perhaps the manufacturer has fixed a problem that occurred like yours). Don’t hesitate to ask a question to the manufacturer’s technical support.Look at how long ago the BIOS update was released and whether it has been sufficiently tested. You may come across user reviews.
- Make sure you have the latest drivers for your motherboard to avoid incompatibility errors.
- Be sure to back up your data to a spare media. If the BIOS update process doesn’t go as planned, your data will still beundefined will be preserved.
- Make sure that all devices are properly connected, the power cable is working, and there are no power outages in your area in the coming hours to avoid power outages when the BIOS is updated, as this will add other problems.
- Save your BIOS settings or any overclocking settings – your custom configurations may not be available after performing the update, so you will need to re-enter them into the already updated version.
- Make sure you have a USB drive on hand and that the connection port is working. This is important to ensure continuity of BIOS updates.

Additionally, you should verify which version of MSI BIOS is installed on your computer. In fact, you might already have the latest version, and the “update” could be unnecessary.
This is how you can check the current BIOS version:
Step 1: Open the Run dialog box by pressing the Win and R keys simultaneously.
Step 2: Enter the msinfo32 command and click OK to view your computer’s system information.
Step 3. In the system information, find the field with information about the BIOS version or its release date. If you compare your version with the latest version of the BIOS on the manufacturer’s website, you can understand whether it needs to be updated or not.
Where can I find and download the latest BIOS for my MSI motherboard?
To find and download the latest BIOS version for your MSI motherboard, follow these steps:
- Visit MSI official website
Typing “msi.com” into your browser’s address bar. - Find “Support” section
This item is located in the top menu of the website - Find your model on the website
You can choose a model from the proposed options. The fields are designed as a drop-down list. Once you find your motherboard in the list,undefined go to this page.

- Download BIOS
On the model page, go to the “Downloads” or “Support” section, then find the “BIOS” subsection. Here you will see a list of available BIOS versions. Check out their descriptions. It is usually better to choose the latest version as it will have the latest fixes and features. Download the BIOS file to your system. Please note that the file has its own compressed format
Prepare a USB drive and update the BIOS
USB drive prepare process
Let’s write about the process of preparing a USB device for installation. Once you have found, verified and downloaded the BIOS update for your motherboard, you need to prepare a blank (formatted) USB drive. It sounds a little confusing for newbies, but rest assured the process will be stress-free:
- Insert the flash drive into the computer’s USB port
- Select and right-click on the drive icon, then select Format
- In “File system options,” select “FAT32.”
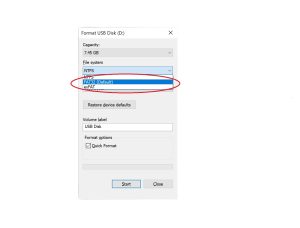
- USB drive formatting process Click “Start” to apply the changes.
- Unzip the downloaded BIOS file you downloaded from the websiteundefined MSI to a convenient folder and copy it to the newly formatted USB drive.
Update process
Great, we have prepared the USB drive for the update, and now let’s move on to working inside the BIOS. To make things easier for us, we will use the built-in utility M-Flash, which will help us install the update from a USB drive. To find the M-Flash utility, you need to go into your computer’s BIOS settings.
Here’s how you can find it:
- Entering BIOS
Reboot your computer. During the startup, press the “Delete” key (or another designated hot key based on your motherboard’s manual) to enter the BIOS setup. On MSI motherboards, ‘Del’ is most commonly used, but ‘F2’ or another key could be used instead. - Navigating BIOS
Once in the BIOS interface, look for a tab or a menu labeled “Advanced”, “Utilities”, “M-Flash”, “BIOS”, or “Tools”. The BIOS interface can vary depending on the model and the BIOS version of the motherboard. - Finding the M-Flash Utility
Select the ‘M-Flash’ option from the list. This might require navigating using keyboard arrows or a mouse within the BIOS interface. It depends on whether your motherboard uses a traditional BIOS interface or the newer UEFI (Unified Extensible Firmware Interface) with a graphical interface. Once you select M-Flash, the system will ask if you want to reboot into the flash mode. Confirm that, and your system will restart into the M-Flash interface.
old computers bios inside view m-flash 
new era computers bios inside view m-flash If for some reason you are unable to find M-Flash, consult the user manual for your specific MSI motherboard for detailed instructions or check MSI’s official website for any BIOS update guides specific to your motherboard model.It is crucial to follow these instructions carefully to prevent any potential damage to your motherboard. Please note that “Q-Flash” is a utility that is specific to Gigabyte motherboards and not related to MSI motherboards. For MSI, the utility you’re looking for is “M-Flash”
- Start to Update
Within the flash utility, select the USB drive that contains the new BIOS file. Choose the BIOS file you’ve placed on the drive. Confirm that you want to proceed with the BIOS flash update. The utility will start updating the BIOS. It is crucial not to interrupt this process.
After the update process completes, the system should reboot. Go back into the BIOS/UEFI and verify the update by checking the BIOS version. – Reapply any custom BIOS settings you noted earlier, as some settings may have reverted to default after the update.
Restart your system once everything is set up to ensure all changes take effect.
Are there alternative update methods?
Yes, of course, you can do an MSI BIOS update without using a USB stick. You can use the MSI Center software (which can be downloaded for free from the Windows Store). Download the application, install it, and then click on the “Support” section, look for the “Advanced” box, and then select the “BIOS Update” option. I would like to note that this method is not the most reliable and sometimes leads to failures.
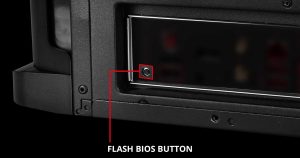
Some manufacturers have a special port called “Button FLASH BIOS”. It is located directly on the device on the side or back of the PC (there will be a small button above it). That is, without additional procedures, you can simply connect the flash drive to the appropriate port and press the BIOS flash button. If everything is good, the light will start flashing and your computer will begin the process. This usually takes a few minutes. But this is also not considered the most reliable method and helps in case of a missing processor or incompatible components.
In conclusion
We hope that with this article we will help you update your BIOS. Remember, if something goes wrong during installation, don’t panic! Contact the manufacturer immediately for advice and support via the feedback form on the website or write to us in the comments.