
Rufus is a handy tool that assists in formatting and creating bootable USB flash drives, including USB keys, pendrives, memory sticks, and more.
It proves particularly beneficial in scenarios where you need to generate USB installation media from bootable ISOs (Windows, Linux, UEFI, etc.), you’re working on a system that lacks an installed OS, you need to update a BIOS or other firmware from DOS or you intend to operate a low-level utility.
Even with its compact size, Rufus delivers all the necessary functionalities!
Rufus Features
File Formatting and Bootable Drives Creation:
- Format USB, flash cards, and virtual drives to various file systems including FAT/FAT32/NTFS/UDF/exFAT/ReFS/ext2/ext3.
- Generate DOS bootable USB drives utilizing FreeDOS or MS-DOS.
- Develop BIOS or UEFI bootable drives, inclusive of UEFI bootable NTFS.
- Create bootable drives from a range of bootable ISOs (Windows, Linux, etc.).
- Fabricate bootable drives from bootable disk images, even those that are compressed.
- Generate Windows 11 installation drives for PCs lacking TPM or Secure Boot.
- Create Windows To Go drives.
Disk Imaging and Partition Management:
- Develop VHD/DD, VHDX, and FFU images from an existing drive.
- Generate persistent Linux partitions.
Checksums Calculation and System Checks:
- Calculate MD5, SHA-1, SHA-256, and SHA-512 checksums of the chosen image.
- Conduct bad blocks checks, inclusive of the detection of “fake” flash drives.
Windows Installation Experience:
Enhance the Windows installation experience by automatically configuring OOBE parameters (local account, privacy options, etc.).
ISO Downloads:
- Download official Microsoft Windows 8, Windows 10, or Windows 11 retail ISOs.
- Download UEFI Shell ISOs.
Software Features:
- Modern and intuitive user interface, natively supporting 38 languages.
- Compact in size. No installation necessary.
- Portable and Secure Boot compatible.
- Completely free software (GPL v3). You have the liberty to distribute, alter, or even commercialize the software, provided that you adhere to the terms of the GPLv3 license.
System Requirements
To utilize Rufus to its full potential, your computer needs to run on Windows 7 or a later version. Once the application is downloaded, it’s ready for use without any additional setup or installation.
Supported Languages
Rufus prides itself on its broad language support, making it accessible to users around the globe. The software natively supports a total of 38 languages, which include:
- English, Spanish, French, German, Italian, Dutch, Portuguese, Portuguese (Brazil), Greek, Bulgarian, Czech, Danish, Hungarian, Norwegian, Polish, Romanian, Russian, Ukrainian, Swedish, Turkish.
- Asian languages: Simplified Chinese, Traditional Chinese, Japanese, Korean, Thai, Vietnamese.
- Other languages: Bahasa Indonesia, Bahasa Malaysia, Croatian, Latvian, Lithuanian, Slovak, Slovenian, Serbian, Finnish, Hebrew, Arabic, Persian.
This extensive language support ensures that a wide range of users, regardless of their language preference, can effectively use Rufus to meet their bootable USB creation needs.
Where To Download Rufus
Today we will consider some options for creating a bootable USB drive, and for this, we will use a Linux ISO file and a Windows ISO file. So let’s get started.
As far as we know, we are in Windows 1122 H2 version, but Rufus also works without any problem with Windows 10, Windows 11, Windows 8.1, Windows 8 (and version 3.22 of Rufus work with Windows 7). So let’s open the browser. In my case, I will use Google Chrome browser.
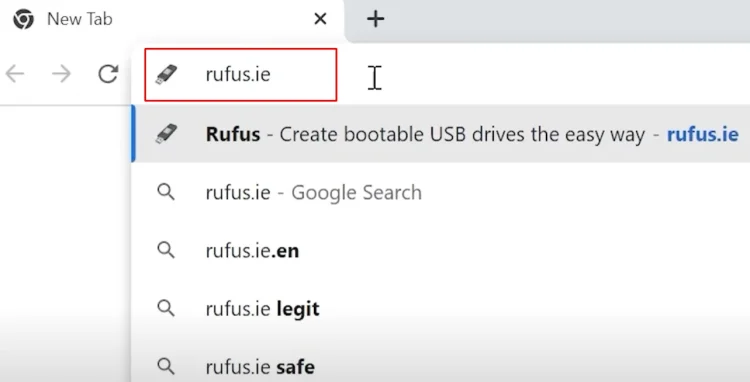
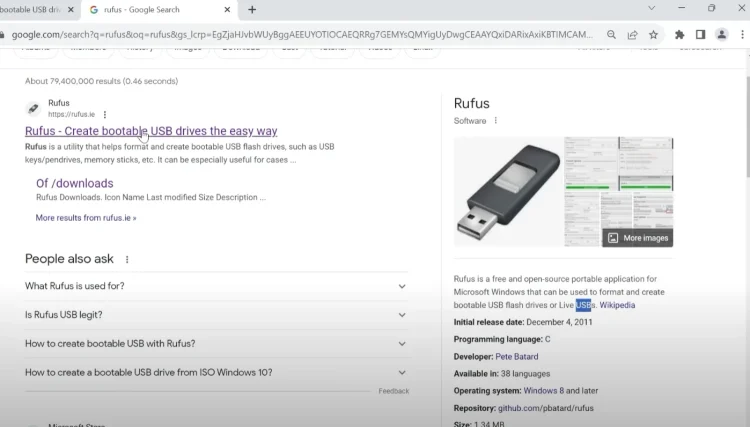
Just click on it in this window. You need to type next: Rufus.ie. So this is the official website. Now you can press Enter.
So here we are on the official website, but I will open a new page and just type Rufus, press Enter.
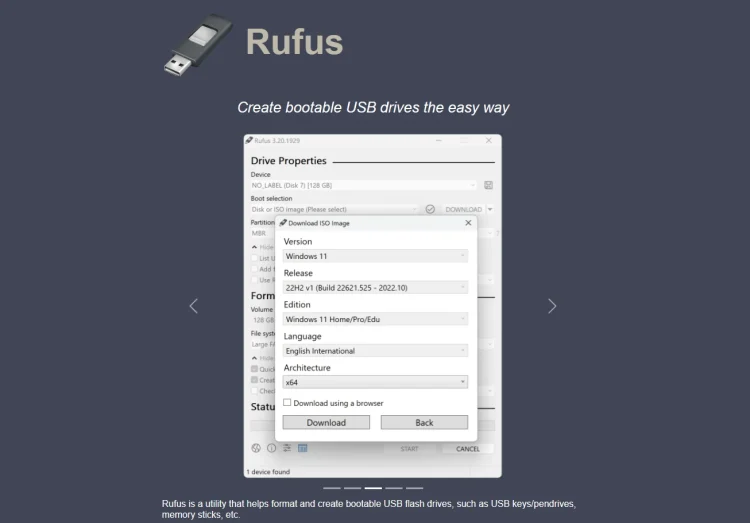
On this page, you can find some useful info about Rufus as a free and open-source portable application for Microsoft Windows that can be used to format and create bootable USB flash drives or live USBs.
In my case, I make a lot of articles on how to create a portable version of different version of Windows, and also you can use Rufus to create a bootable USB stick, to install Linux, to install Windows, to install FydeOS, even to install some Android OS. And again, here we are on the official website. Let’s scroll down a little bit.
Here you may see the interface of Rufus, scroll down one more time.
Which Version Is Best To Choose?
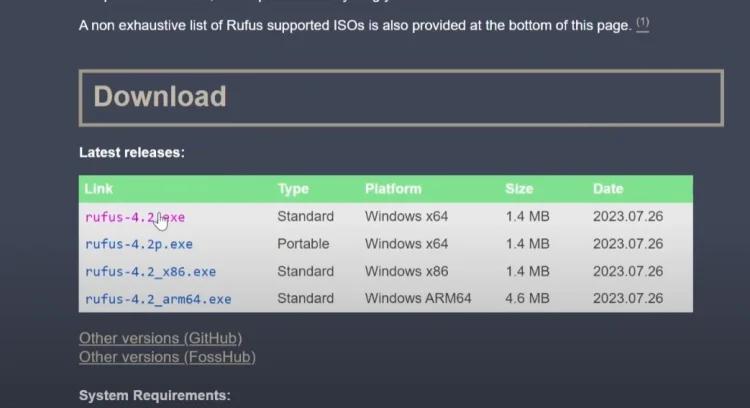
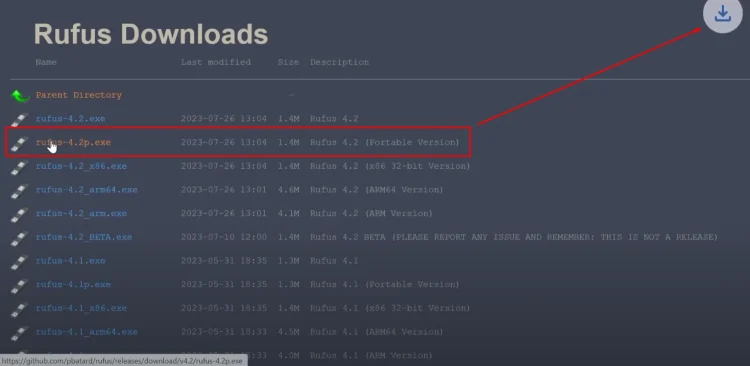
If you are on the official page, you will see the latest version of Rufus, the latest version which you can install on your laptop or PC, and also if you don’t want to install this application, you can just download the portable version.
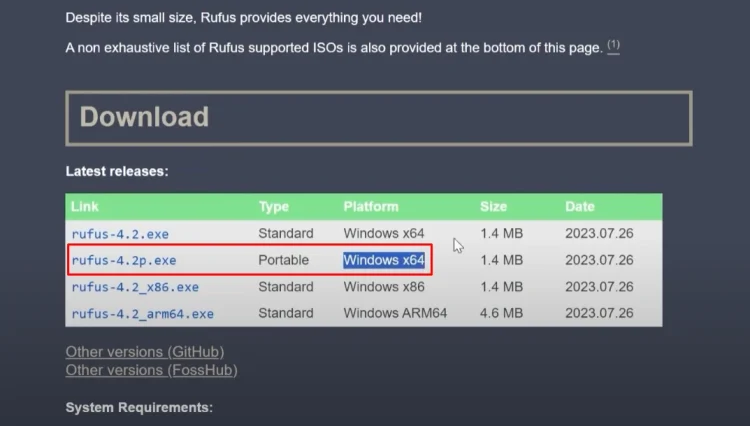
So here we see the portable version for Windows x64. Also, it provides us with the option to install the Windows x86 version, but if you have Windows x64 version, I recommend downloading the latest portable version. It will run as a portable application, no installation needed, and for me, it’s a personal preference.
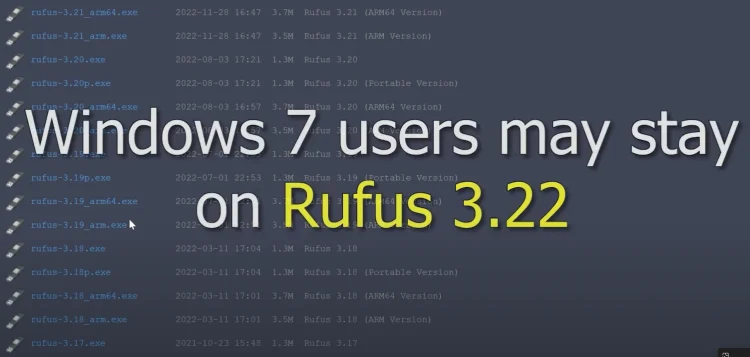
How To Download Older Versions?
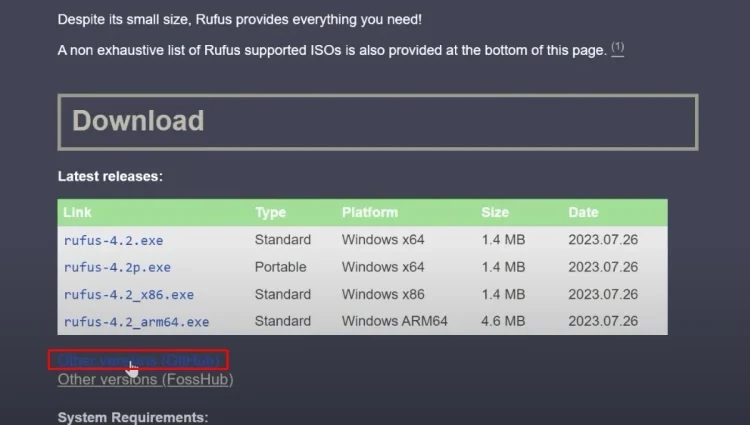
If you want to download the older version, because previously I told you that it also works with Windows 7. You can click on Other versions.
If you scroll down a little bit, you may see the older versions and you can find the most suitable version. If you want to install Rufus on Windows 7, yes, it is possible.
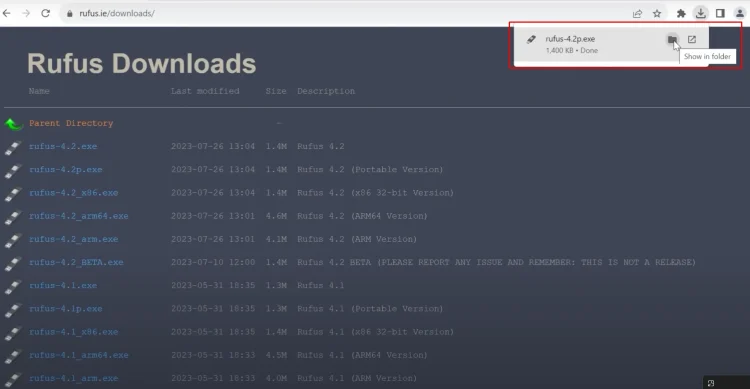
In my case, I have Windows 11, so I will select the latest portable version. I will click on it and as you can see it automatically downloaded on my laptop.
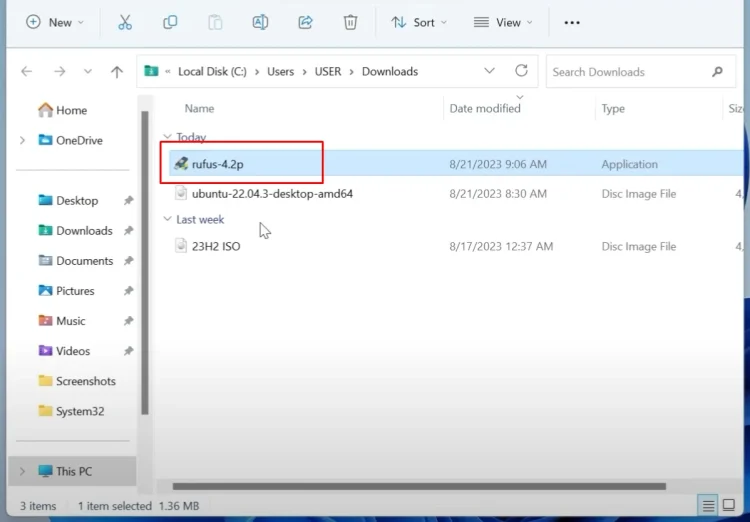
Now we can open the folder, select show in folder.
I will close the browser.
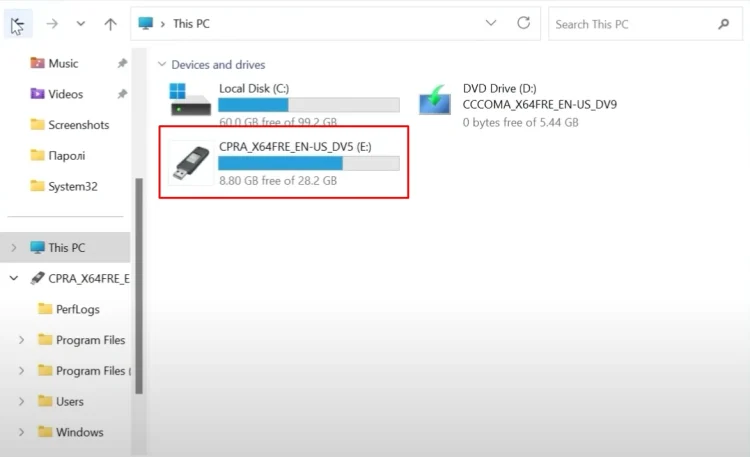
At this stage, I recommend installing your USB stick into the laptop. But even if you run Rufus and then install the USB stick, it still will detect your USB drive. So don’t worry about that.
As you can see, I inserted my USB stick into the laptop and at the moment it has 32 gigabytes of space.
Launching Rufus
Now we can run Rufus. Just click on it.
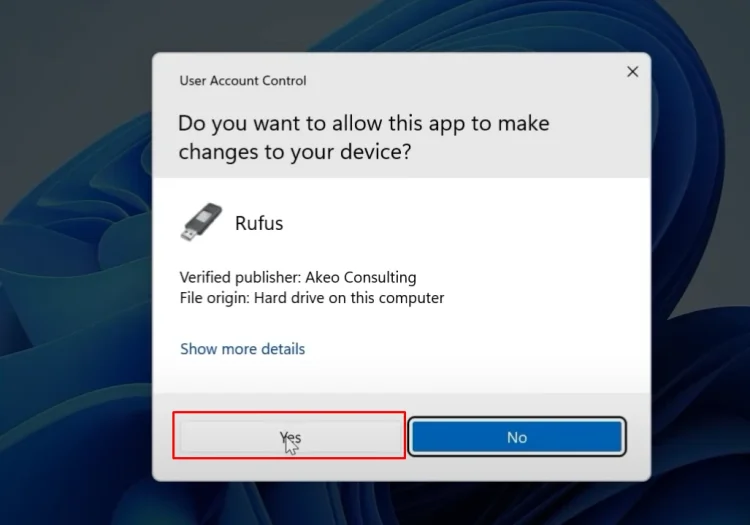
Select yes, most likely it will offer us to update Rufus to the latest relevant version. And yes, here we see the next message.
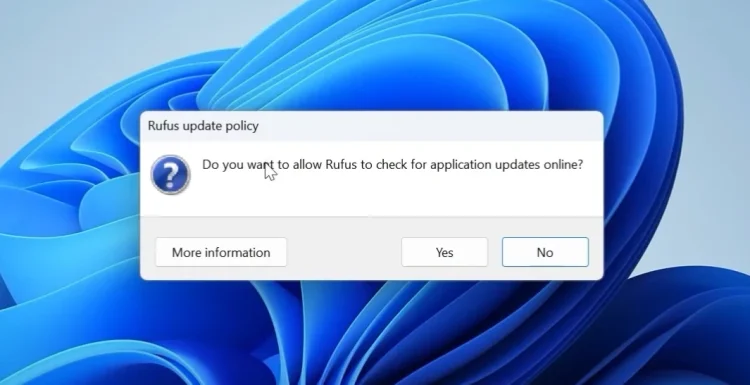
Do you want to allow Rufus to check for application updates online? If you want to get the latest version, you can click on yes, but actually, I already downloaded the latest version, so I will click No. Let’s take a close look. What do we see here?
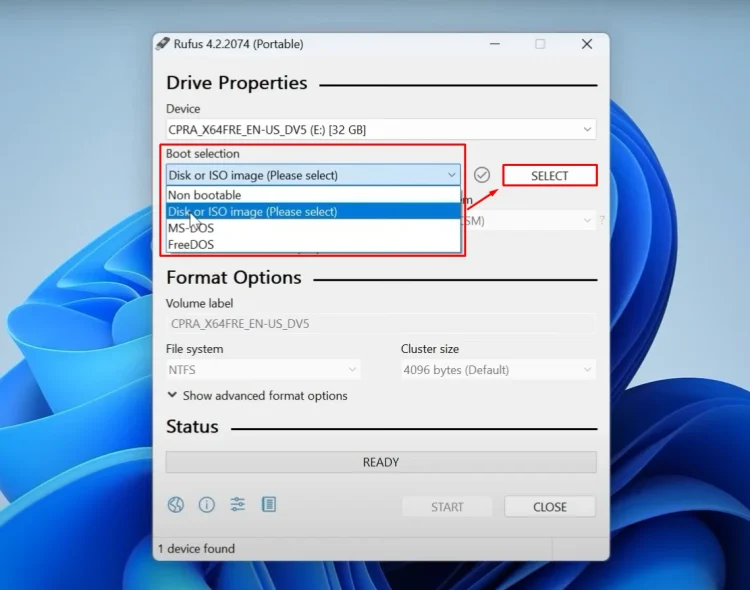
In the device section, you need to select your USB stick or SD card. Yes, Rufus also supports SD cards and from my own experience, I can say it works without any problem with SD cards.
The first step is always easy. You just need to click here and select your USB stick.
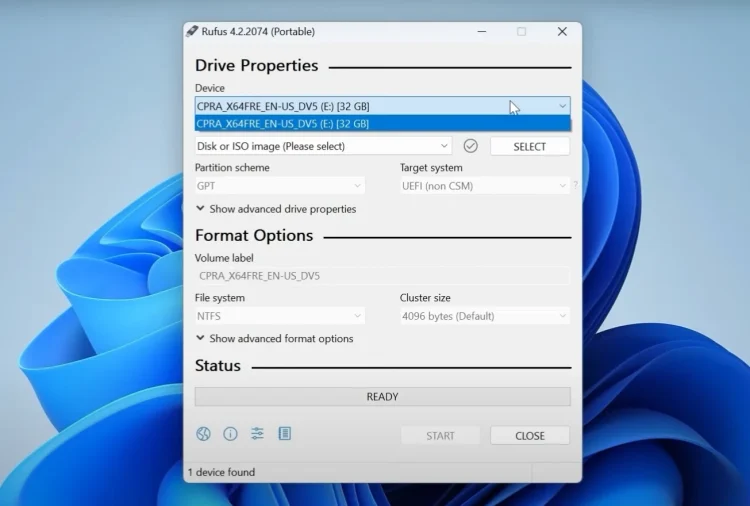
My USB stick has 32 gigabytes of space, so yep, it is my USB drive.
Selecting Linux ISO File
Then, if you want to create a bootable USB stick, for example, to install Linux or Windows, you can click on disk or ISO image.
Select Disk or ISO image then you need to click on select and choose the ISO file.
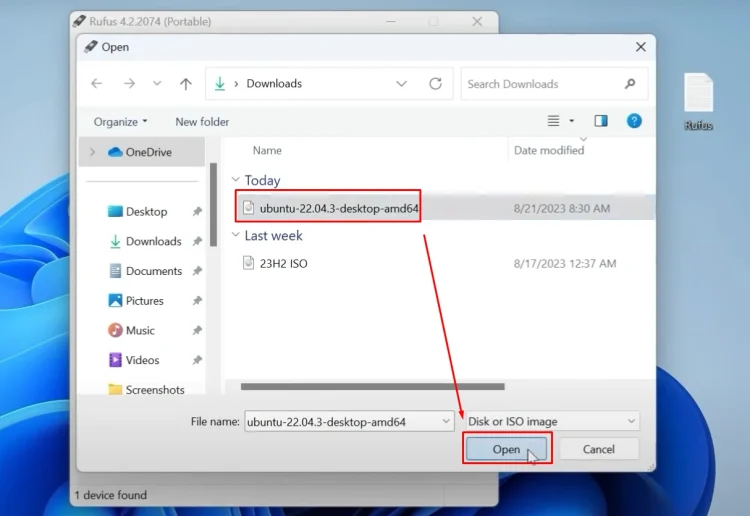
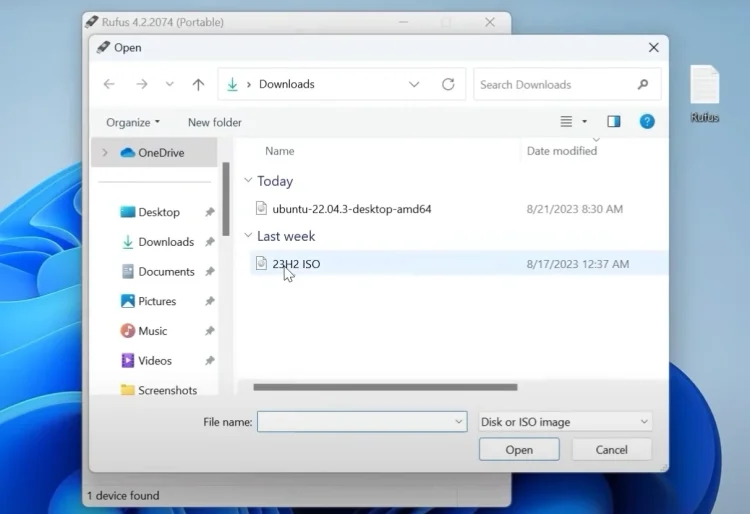
I will click here. So in the folder, I have two ISO files. The first ISO file is Linux Ubuntu and the second one is Windows 11,23 H2 version.
In the first situation, I will select the Linux ISO and then click Open.
Good, after this, I recommend leaving this option by default.
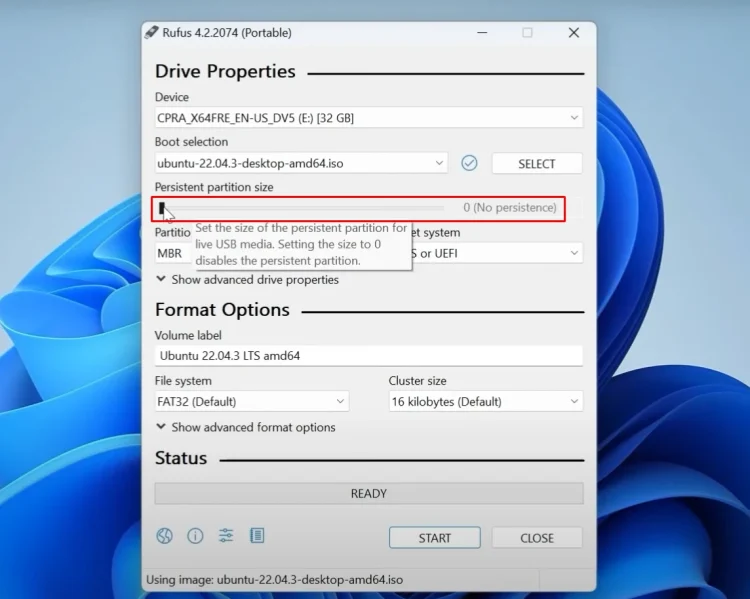
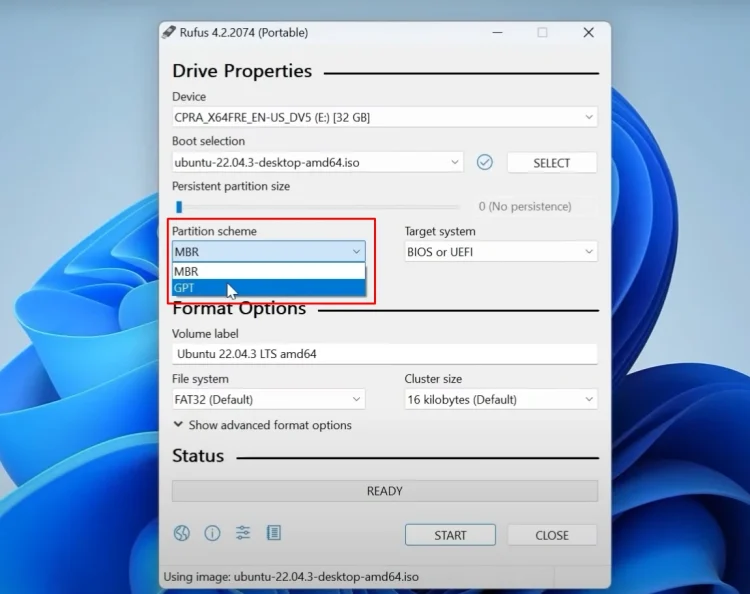
And here you may see MBR and GPT. If you select the MBR partition, it will boot in Legacy. If your laptop supports Legacy, you can select MBR. If you have a modern laptop or PC after 2010, you can select GPT. There are a lot of systems which support legacy and UEFI at the same time.
Of course, you need to set priorities in the BIOS. So if you want to create a bootable USB stick to install Windows or Linux on your current system and you are unsure how it boots in UEFI or Legacy, I recommend doing one simple thing.
How To Know If My BIOS Is Legacy Or UEFI?
You can click on the search and then type next MS info 32 and press Enter.
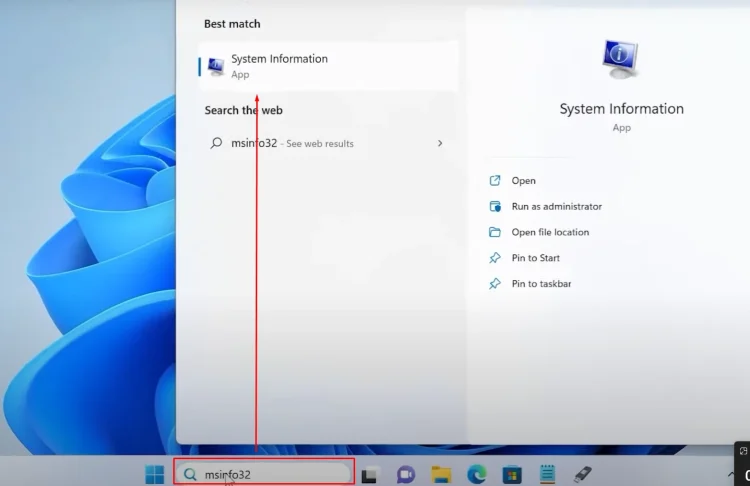
I will open it in full screen to make it more convenient.

Please pay attention and take your time. On the right side, you need to find a BIOS mode, as you can see in my case, I have UEFI, which means here I need to select GPT.
If you want to install an operating system on a different laptop and you also unsure how it works on UEFI or legacy, in this case, I can give you simple advice.
If the laptop is quite old, older than 2010, you can select MBR, and if the laptop was released after 2010, you can select GPT. Understand, if your laptop boots in legacy mode, you need to select the MBR partition and if it boots in UEFI mode, you need to select the GPT partition.
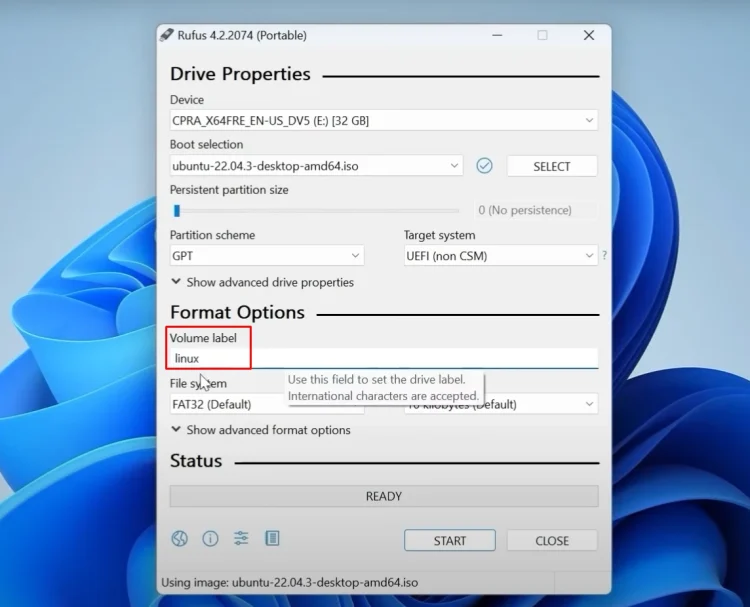
It is quite easy. The last step is quite simple and unnecessary. You can give a name to your USB stick for example, Linux.
What To Select FAT32 Or NTFS?
Also, you may see file system info file system. If you want to create a bootable USB stick, I strongly recommend selecting FAT32 by default.
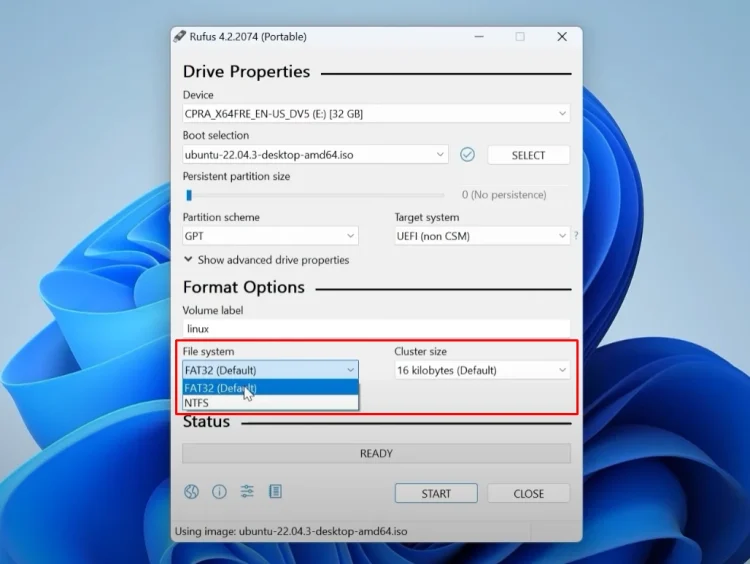
If you want to format your external hard drive, of course, NTFS will be more suitable.
But in our case, we want to create a bootable USB stick for example, to install Linux and then you need to click on start.
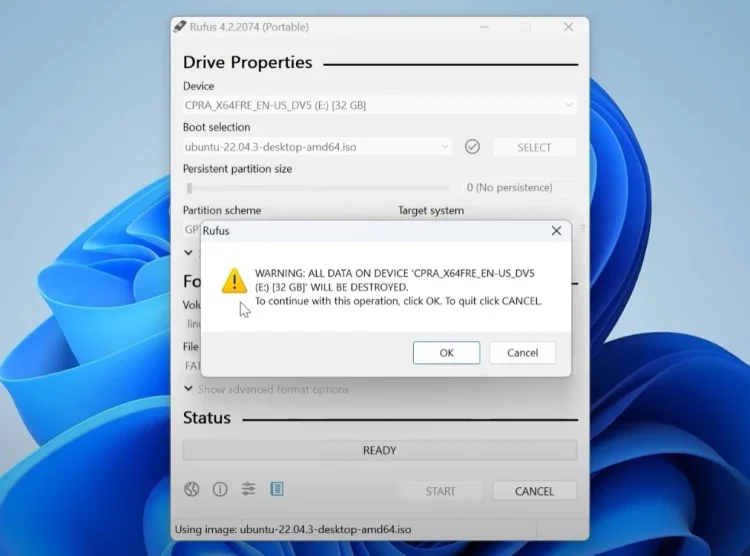
But I want to warn you that all information will be deleted from your USB stick. So if you have some important data, I recommend saving it before doing this. Then you can click on start in this case. Rufus recommends using ISO image mode so that you always have full access to the drive after writing it.
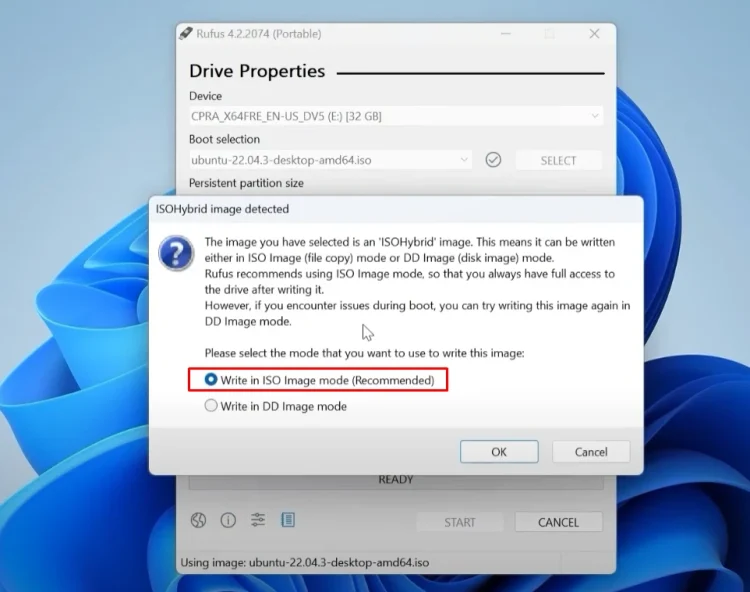
Select this option right in ISO image mode recommended, then click ok one more time.
I want to warn you that all information and data will be deleted from this USB stick. Click OK.
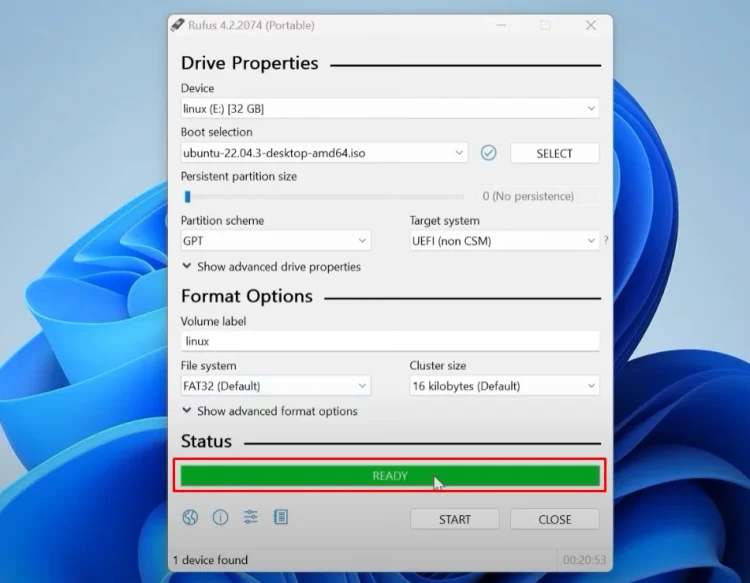
After holding this process, you just need to wait until Rufus will create a bootable USB drive and finally you will see this happy message and the green line ready.
Now you can close Rufus.
Safely Remove USB Stick
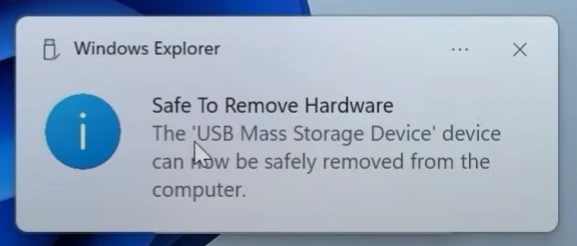
I recommend, after all this process, safely remove your USB stick.
For this, you need to click here, select the USB icon and find your USB drive. So in my case, this is my USB stick SanDisk 3.2. I will click on it.
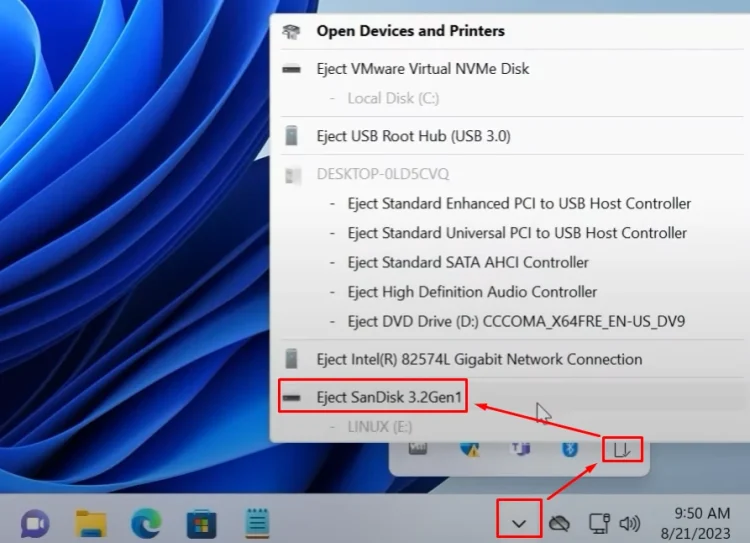
After you receive this message, you can safely remove the drive from the laptop.
Now let’s talk about the second situation when we working with a Windows ISO file. So again, let’s launch Rufus double click.
I will select no like in the first situation, we need to select our USB stick.
Selecting Windows ISO File
Also, if we want to create a bootable USB stick or even a portable USB drive, you need to click here and select disk or ISO image. As you can see, I have a Windows 1123 H2 ISO file.
More Features For Windows ISO
I will click Open.
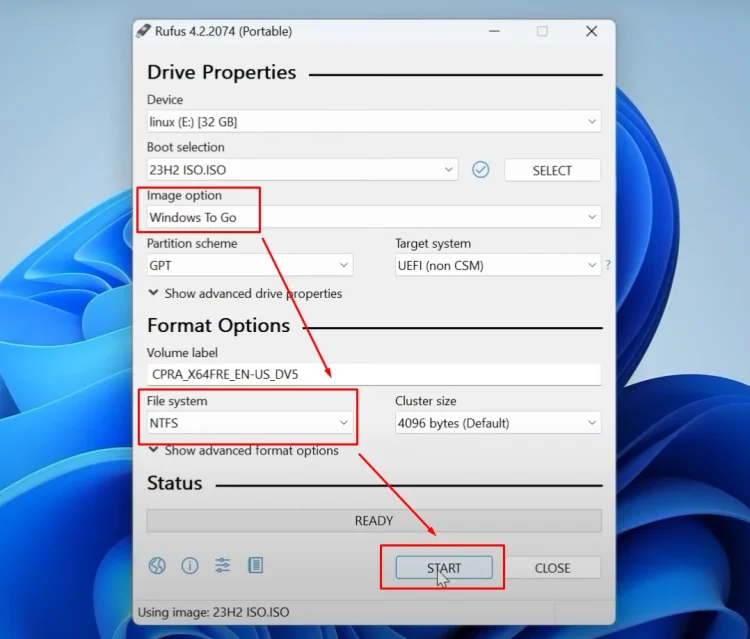
The particular difference in the second situation is that if we select the windows ISO file, Rufus provides us with more options for example. You may see image option.
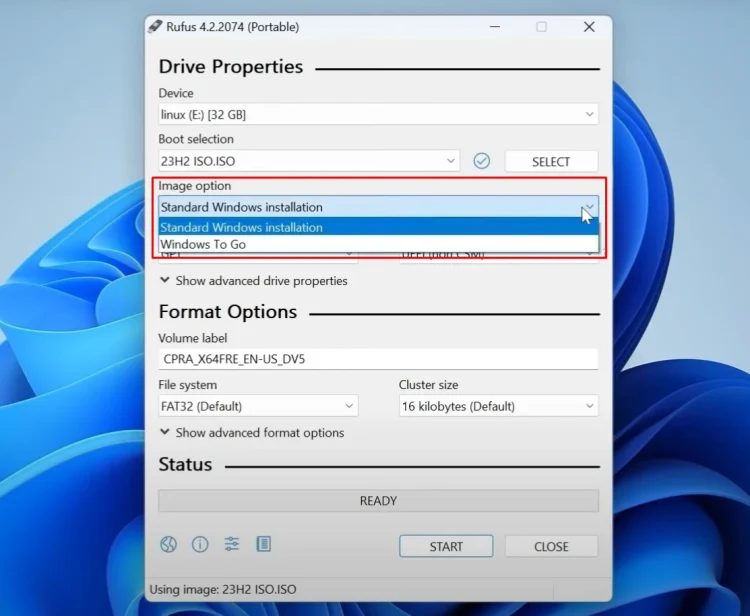
So if you click here, you can select standard Windows installation, which literally means that you will create a bootable USB stick and after this, you can install Windows 10,11.8,1. It all depends on you, and if you select a Windows To Go, you will create a portable version of Windows on your USB stick.
After this, you need to select MBR or GPT. If you want to use legacy mode, select MBR, and if you want to use UEFI, select GPT, for example. I will select GPT. Then leave everything by default and click on Start.

So one more time I want to mention that all information will be deleted from the USB stick. Click on Start.
Windows Standard Installation Options
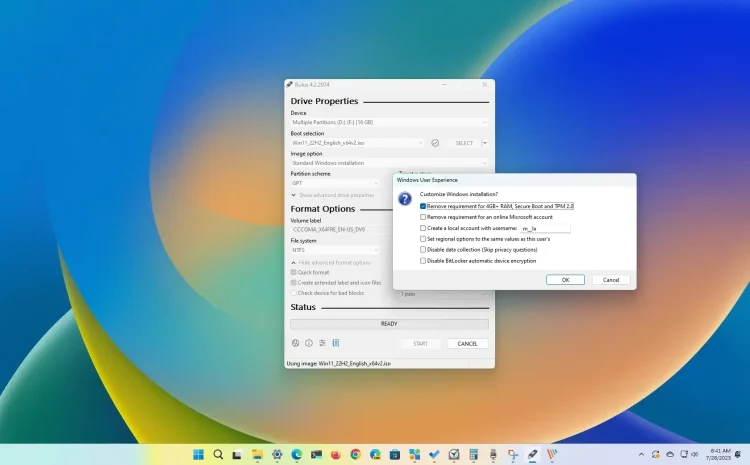
This feature is really handy for a lot of users.
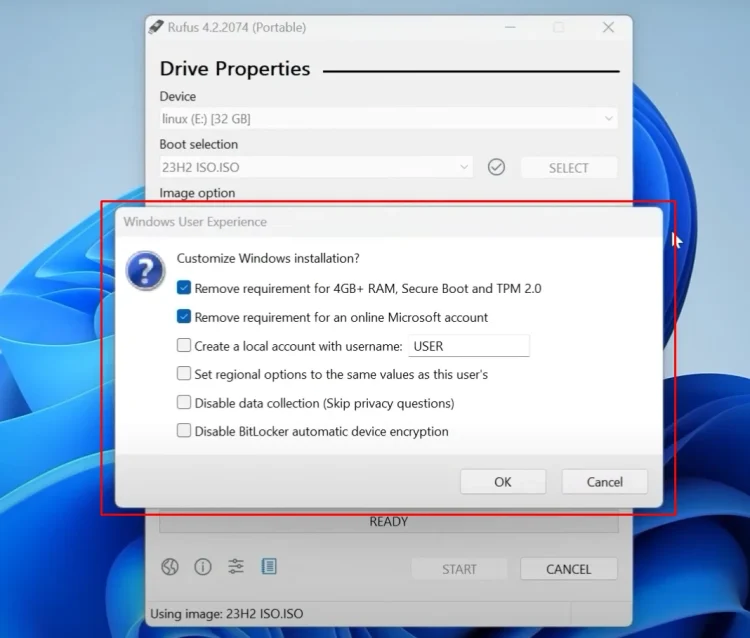
For example, if you have an unsupported laptop and you want to install Windows 11, you can remove the requirement. Also, you can remove requirements for using a Microsoft account. You can create a local account. Disable data collection. Disable BitLocker.
Rufus provides a lot of different options if you want to install a Windows ISO file on your USB stick, so in this case, I will click Cancel, because I want to show you another interesting option.
Windows To Go Options
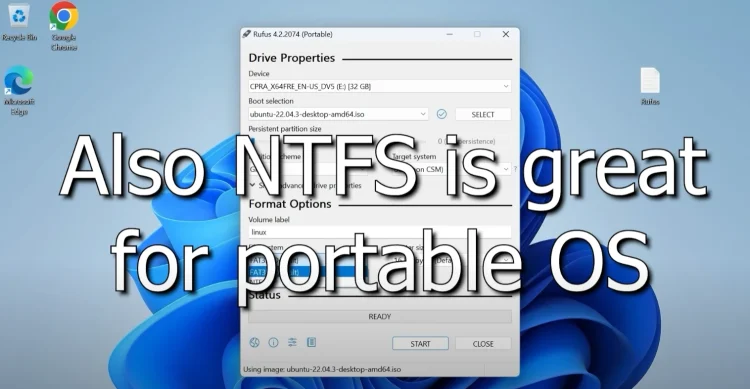
If you select a Windows to go, which means you will create a portable Windows, you may see that the file system was changed and only provides NTFS files, which is really good because it will work more smoothly if we want to create a portable USB stick. So again, let’s click on Start.
This time we have a different option. Instead of bypassing system requirements, we have an option to prevent Windows to go from accessing internal disks, and all other options are quite similar.
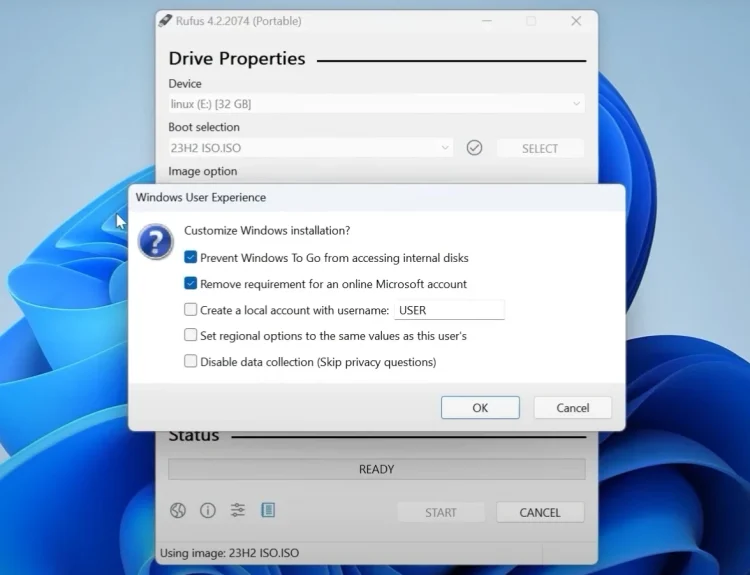
We can create a local account and disable data collection. So in my previous video, I told you and showed that you can actually create a portable Windows 1.23isd version and run it on an unsupported laptop. So if you want to create a portable version of Windows 11 and run it on any unsupported laptop. Believe me, you have such an option also.
I forgot to mention that you can change a username, but actually, it doesn’t make a big difference. For example, I will type User 1. After this, you just need to click OK and again all information will be deleted from your USB stick.
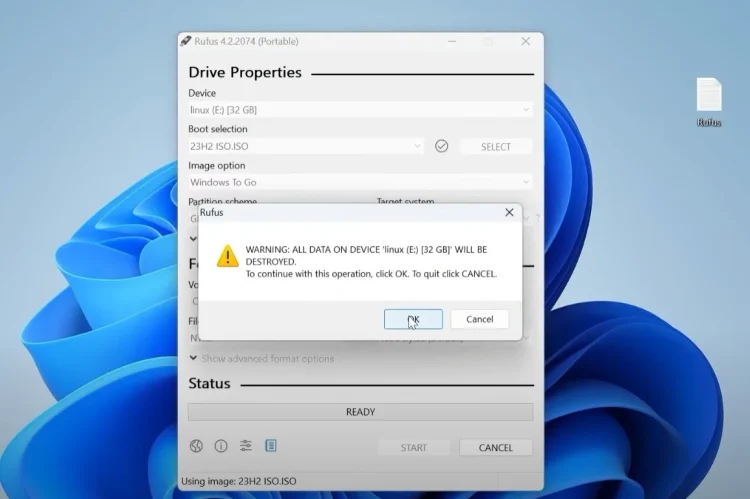
You can click OK and wait until it creates a portable USB stick.
How To Download Windows 11/10/8.1 ISO Using Rufus?
I want to show you one interesting and convenient feature which Rufus allows you to do. If you click on the show application settings check for updates. You can click on disable and change it to daily default.
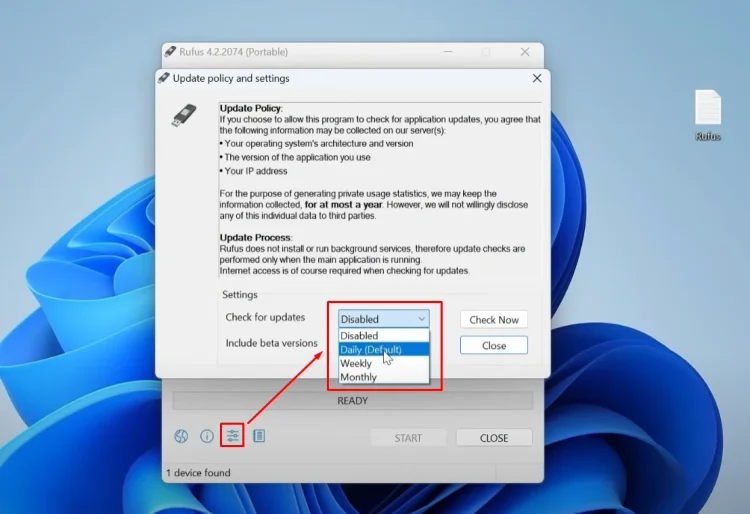
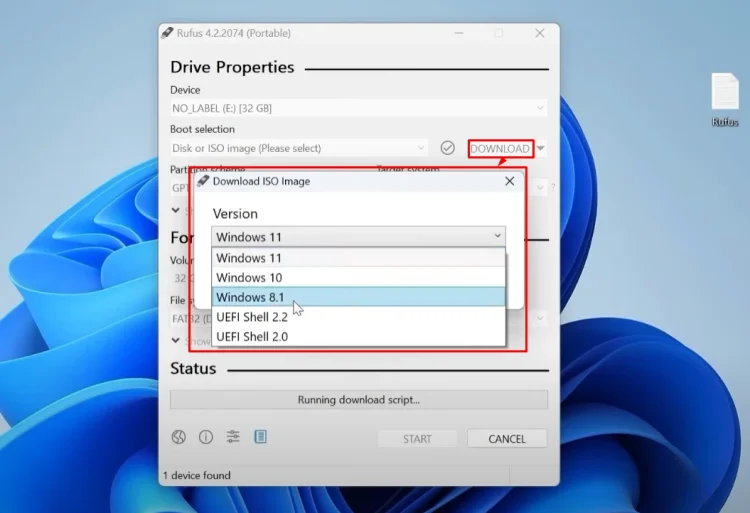
Then you can close this window and close the program as well. Now one more time. Open Rufus. I will go to the downloads. After this. Here you will see a new option. You can click on it and select download now.
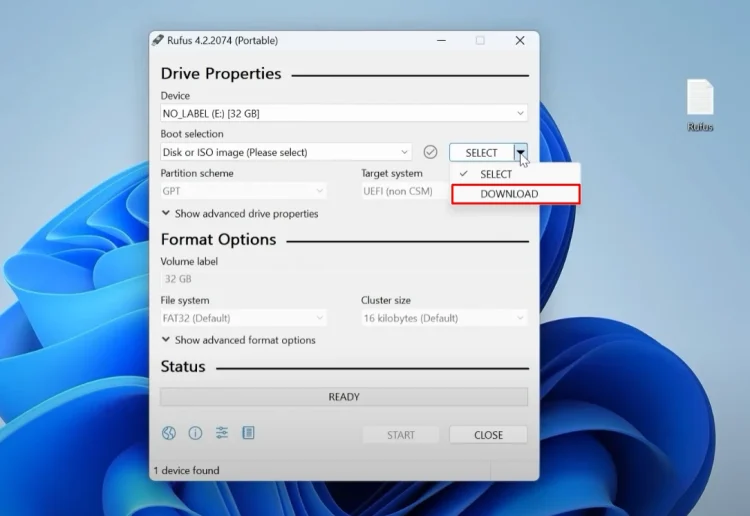
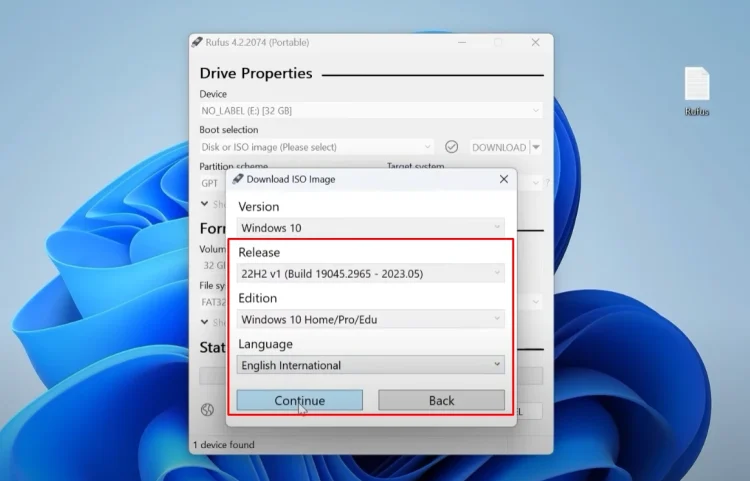
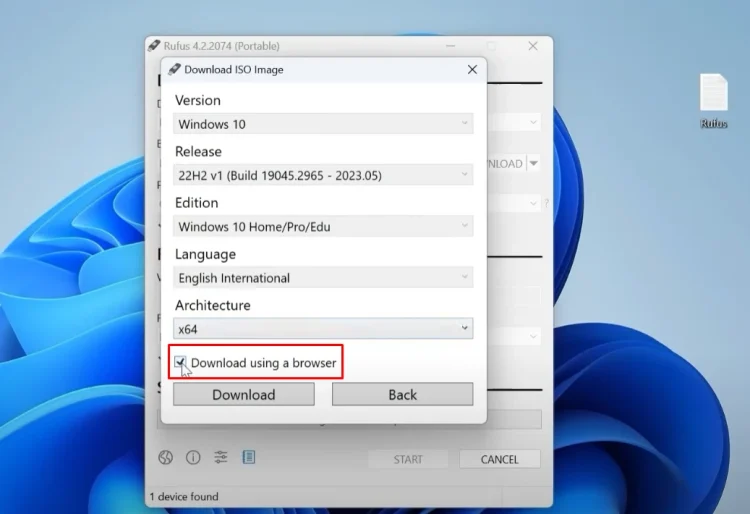
You can click here. Simply to understand, if you don’t want to go through all this process, to go to the Microsoft official website, the download ISO file. You can just download the ISO file using Rufus. So Rufus provides us with the option to select a Windows 11, Windows 10 and Windows 8.1 ISO file.
At the moment we have only 22 H2 version. Now we can click continue, select the Windows Edition, but actually we have only one option because in the installation process you can enter your license key and then it will solve all your problems. On this stage, you can select the language that will be suitable and then click continue.
Here you can change the architecture.
By default, we have x64, but if you have a quite old machine I mean since 2005 or 2009 you can select x86.
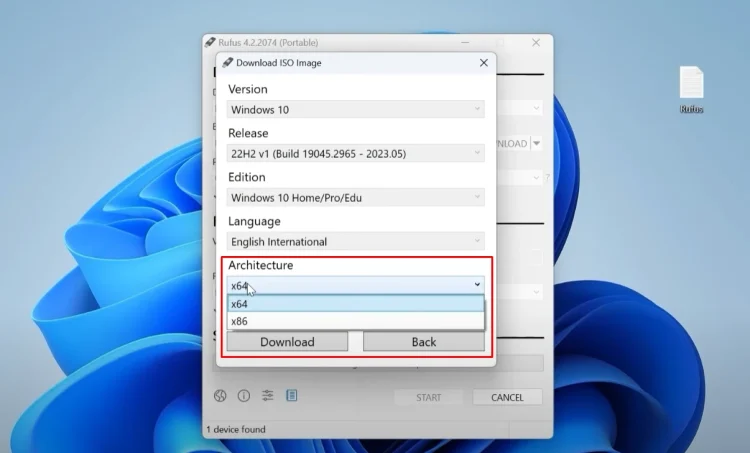
In my case, I will select x64. It will be suitable for most modern laptops and PCs. The last thing that you can tweak is to decide how do you want to download an ISO file? Using a browser or just Rufus?
So if you want to download ISO file using a browser, you need to check this option, and if you want to download ISO file only in Rufus, you can uncheck this option and click download and then just select the place where the ISO file will be downloaded.
I will select the desktop and click save. The downloading process begins and you need to wait until it completes.
Actually, that’s all that I want to share with you today.