
Typically, specialists administering servers use bootable flash drives to simplify and speed up their work, because not all machines may have a virtual environment for installing an ISO distribution. Another method you can use is network installation. This method requires the preparation and configuration of a PXE server, but is more labor intensive than installation using an SCCM server. Installing from a USB drive is a simple and convenient way to always have up-to-date system images at hand for installation and install them on the desired machine in a short time. In this material, we will take a detailed look at the process of creating a bootable USB with Windows Server 2019.
Prepare a USB drive or external hard drive with a capacity of at least 8 GB – the optimal memory capacity is 16 GB. So, the most proven ways in which we can create a bootable flash device are using the Rufus program and using Diskpart from the console administrator. We will look at each method in detail and step by step.
Creating a Bootable USB Using Rufus Utility
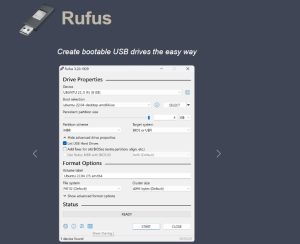
Rufus is software that allows you to quickly and efficiently turn a USB drive into a full bootable device. This utility offers a simple and intuitive interface, thanks to which even without deep technical knowledge you can prepare a flash drive for installing operating systems, including Windows Server 2019.
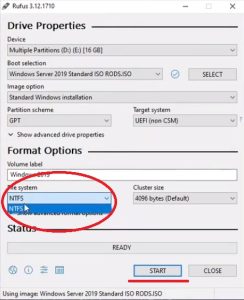
The obvious advantage of Rufus is its ability to work with various file systems, including FAT, FAT32, NTFS and UEFI or BIOS for old and new computers. The program supports creating bootable media from ISO images and can even check USB drives for bad sectors, which ensures high reliability and quality of the bootable flash drive.
Once Rufus downloads, launch it.
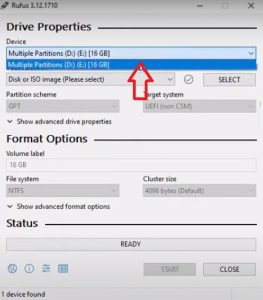
After that, click on the “Select” button next to the “Disk image” column and specify the path to the previously downloaded ISO image of Windows Server 2019.
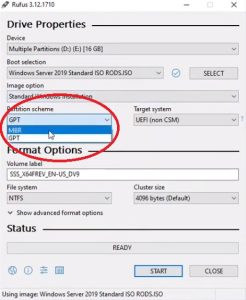
You need to check again that the selected parameters are correct, and if everything is in order, click on the “Start” button. The program will warn you that all data on the USB drive will be destroyed. Confirm the action and wait for the recording process to complete.
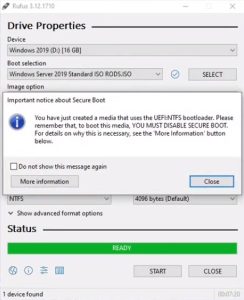
Once the process is complete, Rufus will notify you that your device is ready. You can now remove the USB drive from the port using the Safe Disconnect option.
Save your changes and reboot the server to begin installing Windows Server 2019. Follow the installer instructions carefully to ensure that you are prompted to install Windows Server 2019 on a specific hard drive or partition.

Making a bootable USB using Diskpart
Diskpart is a built-in console tool in Windows operating systems that provides users with advanced storage management capabilities. Diskpart allows you to perform many disk space-related tasks, such as initializing new disks, creating, formatting or deleting partitions, and changing drive letters and paths.
To create a bootable USB flash drive with Windows Server 2019 using the Diskpart tool, follow these steps:
Insert the USB drive into your computer and open Command Prompt as an administrator. To do this, press Win + X and select “Command Prompt (Admin)” or “Windows PowerShell (Admin)”.
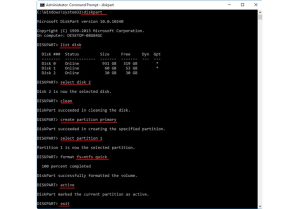
• Type diskpart and press Enter to launch the utility.
• Use list disk command to display a list of all disks. Based on the size, identify the drive that matches your flash drive
• Enter the command select disk X, where X is the number of your USB drive.
• Clean the drive with clean command.
• To create a new primary partition, enter create partition primary.
• To select the created partition, use the select partition 1 command.
• Format the partition in NTFS format using the command format fs=ntfs quick (If the flash drive is larger than 32GB and you want to make it bootable under UEFI, use formatting in FAT32).
• Enable the partition using active command (this command is not needed for UEFI).
• Once formatting is complete, exit Diskpart by typing exit.
Now copy the Windows Server 2019 installation files to the flash drive. Open the ISO file from Windows Server and transfer all the files to the root directory of the USB drive.
After copying the files, the bootable flash drive is ready, and you can begin installing Windows Server 2019 on the desired machine. Connect the finished bootable USB flash drive to the server, go to the BIOS or UEFI settings and set the boot priority from the USB device. I hope that the article was useful and helped you in creating a bootable USB drive.