
Ventoy is open source software that makes creating bootable flash drives much easier and more streamlined. Departing from the classic approach, when each image needs to be written to a separate USB, Ventoy makes it possible to save multiple ISO files on one flash drive – this drive is called multiboot. It is convenient and effective when different operating systems, hard disk utilities, antiviruses and similar programs are collected on one USB. Ventoy was released in April 2020 and the program quickly gained popularity among users due to its developed functionality. It’s not surprising, because Ventoy works with more than 1000 types of operating system images, system utilities and other software, which is confirmed by tests. The developer is listed as Hailong Sun.
How does Ventoy work?
Let’s try to explain it as simply as possible. When your computer starts to boot and you select the Ventoy flash drive as the one responsible for loading the program, your computer, with all its components and system (whether BIOS or UEFI), transfers control to this program. Ventoy then gives you the option to select the desired system image as an ISO file, which is stored on a separate USB partition. Once you select it, Ventoy creates something like a virtual drive that behaves like a real bootable media, and thus loads your chosen operating system or other utility directly from the ISO image, unzipping the files in the process. This operating principle allows you to download or install the selected system from several options.
Advantages of Ventoy
Ventoy greatly simplifies the process of preparing a bootable USB, offering a number of key advantages over similar software:
- As we wrote above, the main advantage of Ventoy is the ability to store multiple ISO images on one flash drive, while other programs for similar purposes require a separate USB drive for each image.
- There is no need to format the disk every time and use other utilities to record images of different operating systems – just drag the new ISO file onto the drive with Ventoy. In this case, the file system on the USB drive will be saved in the same form and everything will work.
- Burned ISO files can be easily accessed through the boot menu as soon as you turn on your PC. You can record Ventoy not only to USB, but also to SSD, HDD, SD card and so on.
- Ventoy works with various BIOS and UEFI systems.
- Ventoy saves time when you need to add or update ISO images by not having to rewrite the launcher.
- Ventoy supports most operating system ISOs and recovery tools, making it a versatile solution for a variety of tasks.
- When booting from USB, Ventoy displays a simple interface where you can easily select the desired ISO to boot without having to change drives.
- Ventoy has a system of plugins available that allow you to set a password, change boot parameters for certain equipment, modify the menu, add your own scripts, enable support for a certain file type, as well as many other useful additions.
- Ventoy has mobile application in the Google Store (unofficial), which can be used with Android devices, without the need for a PC to create a bootable device (such as an SD card).
- The program has an active community that helps in its development. There is a place for questions from those who have encountered difficulties at work.
How to create a multiboot flash drive with Ventoy?
Now let’s move on to the main issue – creating a multiboot flash drive.
0. Prepare your USB device. The volume of the device must be at least the size of all the ISO files you need in total (it is better to choose a drive with 8GB or more).
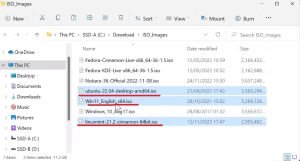
You will also need to download in advance the distributions of the required operating system or other software tools in .ISO format (.IMG, .WIM, .VHD, .EFI formats are also supported). It is better to download images from official sites.
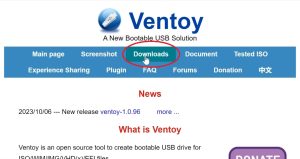
1. Download Ventoy from the official website, where the latest version of the program is available for different operating systems. An alternative to the official website would be the Sourceforge website, where the latest versions of the program are also posted.
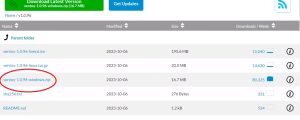
2. If you have Windows installed on your PC, you need the Windows version. Accordingly, if you have another operating system installed, select it. Download the ZIP archive and unzip it into a separate folder.
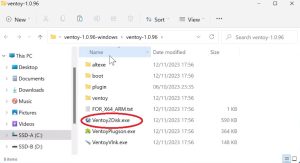
3. Find the Ventoy2Disk.exe file and run it
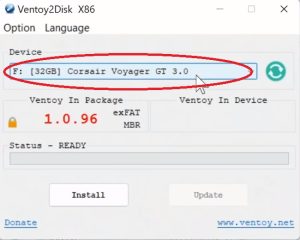
4. Connect the USB drive to your computer. Launch the downloaded Ventoy and select your drive in its interface. Click the “Install” button to install the program’s internal environment.
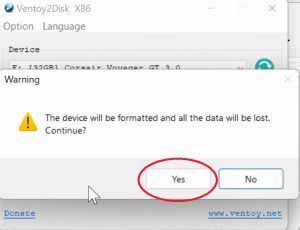
5. You will receive a notification that the program will erase all data on the drive. This is your last chance to copy the data there if you haven’t already done so. Run the installation and wait for it to finish – it won’t take long. Your drive is ready.
6. Once the process is complete, two partitions will appear on the flash drive: one for Ventoy and one for ISO images. As a result, the device’s memory will be divided into two parts: the main volume will be formatted in the ExFAT file system (for Ventoy to work), and the secondary volume will be formatted in FAT, where the necessary ISO files will be located. Select the desired images on your PC to copy to the second partition.
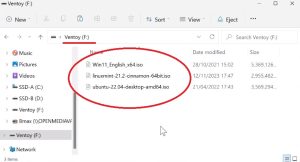
7. Just copy them to your USB device. When copying is complete, restart your computer.
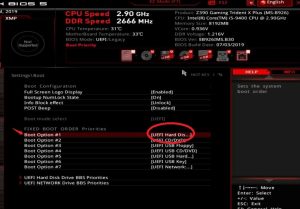
8. Restart your computer and use the boot device selection key to select your USB drive. To enter the computer’s BIOS, you need to restart the device and press a specific key during boot. Typically these are the Delete, F2, F10, F12, or Esc keys, but the specific key varies by manufacturer. See our table to identify the key.
Find the Boot Menu or similar section, where you can change the boot order. This may be called “Boot Priority” or “Boot Order” depending on the manufacturer. In the list of devices, set the USB flash drive as the primary boot device. This can be done by moving the flash drive to the first position in the list. Typically, you use the +/- keys or the Fn keys along with the arrow keys to change the order. Save your selection and restart your PC again.
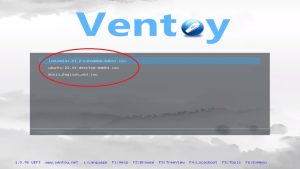
9. If everything is configured correctly, the Ventoy menu will appear on the screen, where all copied ISO images will be available for download.
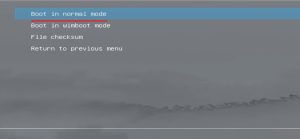
10. Launch the desired one by clicking “Boot in normal mode”. In our case, we are starting the installation of Windows 11.
11. As you can see, the interface to start installing the operating system has appeared, and we can start it.

Based on the tutorial above, working with this program does not seem too difficult. Using Ventoy, you get a powerful tool for running various systems and programs without the need to rewrite or use multiple flash drives. Ventoy saves a lot of time and is extremely easy to use.