

A separate chapter in the history of Microsoft products is a portable operating system called Windows to Go. This tool offers a new approach to mobility and flexibility in working with the Windows operating system. The function allows users to literally carry the operating system with them – their desktop with files and programs, which can be launched from another computer by inserting a USB drive into it. In this article we will tell you more about the Windows to Go project, its development and closure, as well as alternative existing methods for creating USB with Windows to Go today.
What is Windows to Go?
The essence of Windows to Go is to create a working version of Windows that runs from an external drive, most often a USB flash drive. Initiated in Windows 8 and continued in Windows 10 Enterprise and Education Edition, the technology was designed for IT professionals and enterprises to ensure security and ease of use. Its uniqueness lies in the fact that you can carry portable Windows with you always. To run it, just connect your media to any computer device. When launched from the media, your workspace will be loaded with all settings, applications and files, while maintaining the security of the main computer system. After the release of the stable version, users noted the convenience of the new operating principle, but there were also weaknesses: low operating speed depending on the media, working only with certified drives from the list proposed by Microsoft, inability to work with the device’s hard drive (only within the drive’s memory), impossibility of recovery, compatibility and security issues.
Closing the official version of the project
After collecting feedback from users, Microsoft unexpectedly stopped the development of Windows to Go (starting with Windows 10 version 1903), leaving users with existing versions without further updates.
This decision was due to many factors, including:
• Productivity
Windows to Go depended on the performance of USB devices, which did not always coincide with user needs due to differences in speed and storage capacity of the media. In addition, Microsoft certified only a small number of devices for use as media, which did not please users.
• Limitations and hardware compatibility
Key technical barriers included difficulties in updating the system, as well as lack of compatibility with some equipment, which hindered widespread adoption of the platform. As a result, to install Windows To Go using the standard functionality, you need certain editions of Windows 8.1 or 10. For Windows 8.1 this is Enterprise, for Windows 10 – any from Professional and higher.
• Development of cloud solutions, virtualization and remote access
Cloud services offered more flexible and scalable ways of working, allowing the user to work with data and applications without being tied to a specific device or physical media, and improvements in virtualization provided similar mobility benefits, but with improved management and security aspects.
The combination of these factors made it clear to Microsoft that the support and development of Windows to Go was not aligned with their long-term strategic priorities, although the workspaces created by Windows to Go continued to function and users with qualifying versions of Windows could still receive support.
Existing alternatives to Windows to Go
This niche did not remain empty – the creation of alternatives with functionality similar to Windows to Go (the name stuck) was undertaken by third-party developers who have no relation to Microsoft and its product. Software such as Rufus, WinToUSB, AOMEI Partition Assistant offers users a worthy alternative, allowing them to create portable Windows systems from different versions and editions.
Creating a Windows to Go USB Flash Drive (Windows 11) using Rufus
At this point, we will move on to the practical part of the article and create a USB drive with Windows to Go using Rufus. The Rufus developers created their own mechanism to support running Windows from USB drives and implemented the ability to create a portable operating system (Windows to Go) using almost any Windows configuration. Today we will show how to do this using Windows 11 as an example.
To create a Windows to Go flash drive you will need:
• Rufus software, which can be downloaded from the official website.
• Image of the operating system Windows 11 (ISO)
• USB drive 8 GB for Windows
Download the Windows 11 ISO image from the official website, for this you can follow the link above or enter a search query in Google

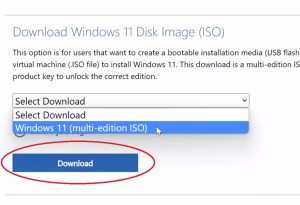
On the Microsoft website, select the Windows 11 (multi-edition) image and click “Download”
After this you will be taken to the language selection field
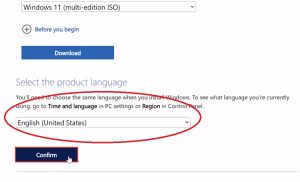
Then you need to select the system bit size. After this, the download of the ISO image of the operating system will begin.

Go to the official website of Rufus software
Select the full or portable latest version of the program and download it

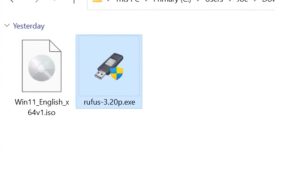
Ultimately, you should have a Windows 11 ISO image and a Rufus installation file. At this point, insert your USB drive into an open port.
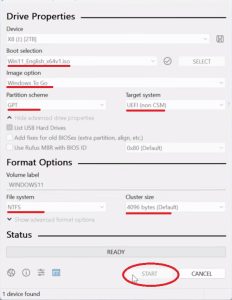
Let’s go to Rufus. In the “Device” field, select your USB drive, and in the “Boot Selection” field, select the Windows 11 ISO image
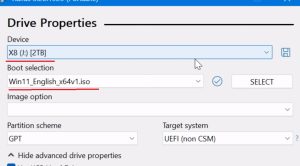
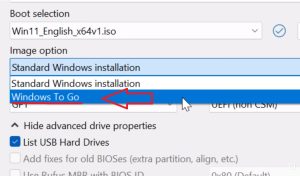
In the “Image option” field, select “Windows to Go”
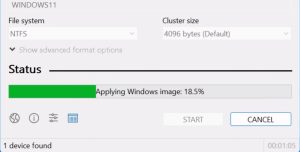
The program will automatically adjust the remaining settings. Click “Start”
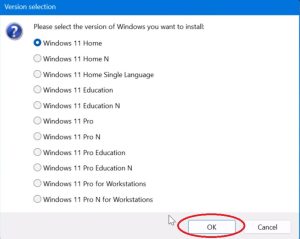
Select the desired version of Windows 11 to install
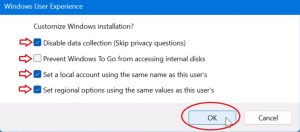
The following options concern personal settings, select them according to your preferences
The program will warn you that existing data on the USB drive will be deleted during the recording process

The program has started working, it will take a few minutes
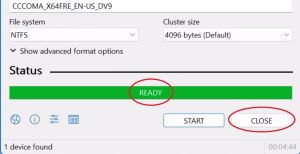
At the end of the work you will see the inscription “READY”. The recording is over.
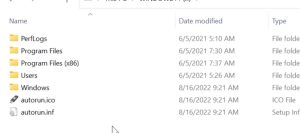
Let’s go to the root folder of our drive, the files are in place
Now we need to configure the boot priority from the USB drive and disable the secure boot mode in the BIOS. To do this, restart your computer and immediately pay attention to the screen. Each motherboard has its own key to enter the BIOS: it can be F2, Delete, Esc or another. This information is usually displayed on the initial screen. Press the desired key without missing that short period of time immediately after turning it on. Wait for the BIOS interface to load. Head to the Security or Boot section, terminology varies from manufacturer to manufacturer. This is where the option called Secure Boot.
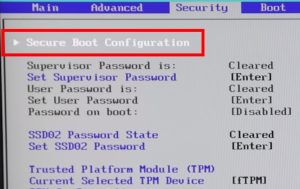
If you are greeted with the “Enabled” status, feel free to change it to “Disabled”, confirming your choice with the Enter button. To save the settings, you need to press the F10 key.
In the Boot Menu section, select boot from your USB drive.

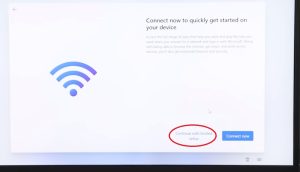
If the settings have been applied, you will see a message asking you to establish a network connection in order to continue starting with a Microsoft account. Click “Continue with limited Setup”
Next we will be greeted by a familiar desktop.

Ready! Installation of Windows to Go completed. Now you can safely use Windows 11 with the desktop environment on your USB drive. I hope the installation steps were clear to you and everything went well.