

The error that will be discussed today is called ACPI BIOS ERROR and it frequently has the code 0x000000A5. This error triggers the so-called “blue screen of death” or BSOD. Its name unequivocally hints at problems with the Advanced Configuration and Power Interface (ACPI), but, like other BSOD errors, it can be caused by different issues.
What is ACPI?
ACPI stands for Advanced Configuration and Power Interface. Since its release in December 1996, it has been regulating the power consumption of computers and mobile phones, serving as an industry specification. It is useful for the detection and configuration of computer hardware components.
Its core functions include:
- Selecting the timing for powering the device on or off.
- Switching to low power consumption when the battery is low.
- Preserving essential programs and locking the rest.
- Reducing power requirements to the motherboard without prior device activation.
- Supporting power management for modems, printers, and other devices in standby mode.
- Supporting drive control features.
When can the error occur?
- During the operating system boot-up.
- While installing or updating the operating system.
- After changes made in BIOS settings.
- Due to damaged or outdated drivers.
- From RAM errors as a result of upgrades.
- When enabling/disabling sleep or hibernation modes.
Possible solutions
Run system recovery
If the operating system boots and you have restore points, try to roll back the system to an earlier state. If the cause is driver conflicts, this may help. If the ACPI BIOS error prevents the operating system from fully booting, try booting in safe mode and perform diagnostics from there.
Disable or configure ACPI in the BIOS settings
You can eliminate the blue screen of death BSOD by disabling the ACPI mode.
This can be done in two ways:
- Before starting the installation of the operating system, enter the BIOS using the keys recorded by the manufacturer of your equipment for entry (these can be the Del, F2, F12 keys, and others.
- Find the parameter responsible for power management (Power Management). Don’t worry, the menu of your device may have a different equivalent designation of the parameter related to power management, the name depends on the firmware version and the motherboard.
- Disable ACPI or set the ACPI mode to S1.
- Press “F10” to save the result and restart the PC.
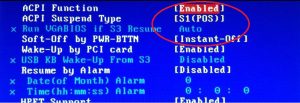
- Now you can install Windows.
If the ACPI BIOS ERROR occurs during the operating system installation, ACPI can be disabled as follows:
- Start installing the operating system anew;
- As soon as the text “Press F6 if you need to install a third-party SCSI or RAID driver” appears on the screen, press the F7 key.
- This will cancel the installation of the ACPI driver and continue the further installation of Windows.
Running a diagnosis of Windows system files
If you have the Windows operating system installed, open the command line as an administrator (to run the command line as an administrator in Windows 8/10/11, you can enter “Command Prompt” in the search in the taskbar, then right-click on the found result — Run as administrator) and enter the sfc /scannow command so that the system can check and restore system files.

After entering the command, the system check will begin, as a result of which the found integrity errors that can be corrected will be automatically corrected with the message “Windows Resource Protection found corrupt files and successfully repaired them,” and in their absence, you will receive a message that “Windows Resource Protection did not find any integrity violations.”
Resetting the BIOS to factory settings
This can help if settings were changed, which might have led to the ACPI BIOS error. If the error began to occur after making changes in the BIOS settings, you should restore the original parameters or reset the BIOS configurations by removing the CMOS memory battery for a few minutes (a universal method). Watch a video on how to do this.
Updating the drivers of key components
If the computer still boots, try updating the drivers of key components—memory, chipset, hard disk, and other vital hardware. It is best to use automatic programs to update drivers such as Driver Booster or similar software, which will spare you the need to search for drivers online and install them manually.
Deleting the hibernation file
If you notice that the ACPI_BIOS_ERROR appears right after the computer exits hibernation, try deleting the Hiberfil.sys file located at the root of the system drive.
The hiberfil.sys file is a hibernation file used in Windows to store data for their subsequent quick loading into RAM when a computer or laptop is turned on.
To do this, execute the command «powercfg.exe /hibernate off» in the command prompt and press Enter.

You will not see any messages about the successful completion of the operation, but hibernation will be disabled, and you can check the system for the presence of the ACPI_BIOS_ERROR.
BIOS Update
Updating the BIOS firmware is the very last resort, which should be considered when all other methods have not yielded positive results.
Follow these steps for updates:
- Preparation for the Update Before starting the process, ensure you have a stable power source to avoid failures during the update. If you are using a laptop, plug it into the mains.
- Identifying the Motherboard and Current BIOS Version Find information about your motherboard’s model and manufacturer, as well as the current BIOS version. This can be done by entering the BIOS upon PC startup.
- Searching for the Required Update Visit the official website of your motherboard’s manufacturer and download the latest BIOS version that is suitable for your model.
- Creating a Bootable Device If the BIOS update requires creating a bootable USB drive, use the archives and instructions provided by the manufacturer to create a bootable medium with the updated BIOS.
- Executing the Update Procedure Follow the update instructions, which may include rebooting the computer and entering a special BIOS update menu.
- Checking the Update After the update process is complete, the computer will automatically reboot. Start the system and check if the ACPI BIOS error has disappeared. Make sure that your computer works stably with the updated version of BIOS.
In conclusion
In conclusion, addressing an ACPI BIOS ERROR can be a complex task that may require a series of troubleshooting steps, including system recovery, configuration changes in BIOS, and updating system drivers. If these measures do not resolve the issue, updating the BIOS firmware may be necessary—a careful procedure that can rectify compatibility issues but should be approached with caution to avoid potential damage to your system. Always ensure that you follow manufacturer-provided instructions closely and have a reliable power source throughout the process. After updating, verify that the error has been resolved and that your system is stable. Remember, while detailed online guides can be invaluable, consulting with a professional.