
Many of us periodically faced the issue of creating a bootable flash drive with a particular operating system and then installing it on the computer to restore its functionality. Having such a device on hand is very useful, because it contains everything you need to help at the right time. It’s unpleasant when you’re waiting for your computer to be restored, plug in a bootable USB flash drive, and it refuses to work. Perhaps the download from the flash drive started, but for some reason was interrupted. In this article we will talk about the reasons for flash drive failure and the most accessible testing and verification methods.
Why won’t the bootable flash drive start?
Flash drives, like other electronics, can sometimes fail. As a rule, this happens at the most inopportune moment. Here are the reasons why a USB device may not boot.
1. Damage to the file structure
The structural integrity of the disk space may have been damaged, which is often characteristic of the well-known NTFS system, which lacks embedded functions to analyze and resolve problems with its configuration.
2. Physical damage to the device
The electronic components of a flash drive can fail over time as a result of being dropped, exposed to environmental factors, or left unconnected for a long period of time.
3. Flash drive file system
If the flash drive is formatted and written to a file system that the computer does not support, it will not work properly or at all.
4. The problem is on the computer side
There could be many reasons for this. The computer may have damaged or disabled USB ports, an outdated BIOS, or incorrectundefined UEFI settings. Loading may be hindered by various errors. Here the reason is no longer in the bootable USB, but in the computer on which it runs.
How to test your device quickly and without restarting your computer?
Luckily, there is software designed to test the functionality of a bootable USB device. Such programs work based on the emulation process. We will look at the most common programs WinSetupFromUSB and MobaLiveCD, which are tools designed for creating and testing bootable USB drives. They have a number of features that greatly simplify the process of checking a USB drive.
WinSetupFromUSB
WinSetupFromUSB is a powerful tool whose main focus is creating a bootable USB drive. With its help, you can create a multiboot device – on one disk you can place several operating systems, such as Windows, Linux, as well as various utilities for diagnosing or restoring the system. But in our case, the program can help with checking the bootable flash drive using the “Test in QEMU” function. If you need a quick solution within a session in the operating system without rebooting the computer and entering the BIOS/UEFI, then this is a great choice.
You can download the program here.
Let’s look at the check function in more detail. First, insert the USB that needs to be checked into the computer. In the program window with the choice of boot device, select our USB device.
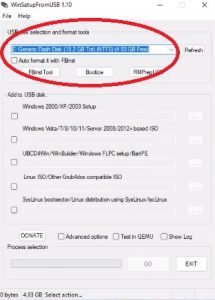
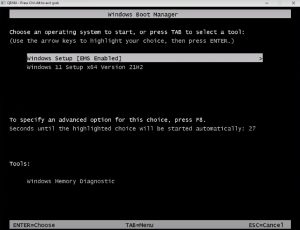
Then check the “Test in QEMU” box and click “Go”
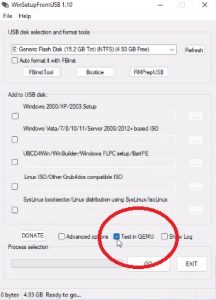
The program will display an emulation of loading and checking the device
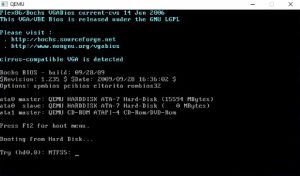
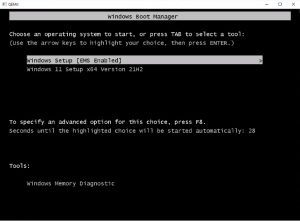
If the USB drive is working, then after a while we will see a menu for selecting a bootable flash drive. This means that the bootable flash drive is working properly.
MobaLiveCD
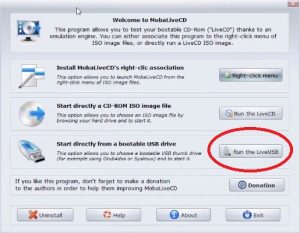
Another software in the bootable media creation category. What makes this program stand out is that it allows you to run Linux distributions and other ISO images in a separate window right on your PC’s desktop. And all this happens without burning the iso image to disk. In addition to the function of testing ISO images without burning them to USB or CD/DVD, the program has a built-in emulator, QEMU, which allows you to simulate a full boot of the operating system from USB.
You can download the latest version of the program here.
Let’s look at the functionality of checking the bootable flash drive of this program. Insert the desired USB drive and launch the program by right-clicking and the command “Run at Administrator”
In the program interface, select the “Run the LiveUSB” option
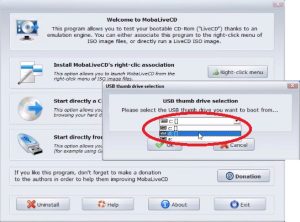
In the menu that opens, select the disk name corresponding to our bootable flash drive.
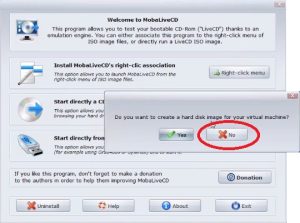
In the window that appears, where the choice of creating a hard disk for the virtual machine is offered, we click no. This is not necessary to verify the download.
Next, the QEMU emulator will launch and begin downloading data from our USB device. If everything is in order, the program will display the boot menu as in the screenshot below. If your device malfunctions, you will receive an error message.
In conclusion, using these programs, you can not only create bootable USB drives for various operating systems and utilities, but also make sure that they will boot correctly without leaving your operating system session and without having to change your computer settings.