
In this article, we will look at the possibility of using SD memory cards not just as a place to store photos or video files, but also as an independent boot device. For example, for installing and running operating systems (including on mobile devices), as well as storing various recovery utilities. When we talk about an SD card, we also mean microSD.
As you know, the vast majority of bootable devices are created using a USB drive. But if we consider the difference between boot devices, where there will be a USB drive on one side and an SD card on the other, then in general we can say that they are intended for the same thing – storing data. Therefore, it is quite possible to use an SD card as boot media. The only difference is in a few points: the USB drive is connected to a port that is used on almost all devices, while the SD card reader is not built in everywhere. Reading, writing speed,undefined transfers and storage capacity vary by USB or SD drive manufacturer and may be comparable on these parameters. It is also worth noting that for an SD card, as for a USB, there are a number of programs that can turn the drive into a bootable device.
In what cases are bootable SD cards used?
Let’s look at cases where an SD card can be useful as bootable media
Installing Operating Systems on Computers or Laptops
One of the most common uses for bootable SD cards is to install a new operating system. Some modern laptop and netbook models have a built-in SD card slot and support booting from an SD card in BIOS/UEFI. But it is worth remembering that not all of them can boot from SD cards directly – this is worth checking before starting the process. If this function is not supported, you can use a card reader connected via a USB port.
Launching the OS on mobile devices
You can use bootable SD cards to run operating systems on mobile devices or single board computers such as Raspberry Pi or Android devices. Some cameras and camcorders that support firmware or operating system settings via an SD card can also boot directly from the cardundefined memory. Game consoles such as the Nintendo Wii can be modified to load software from an SD card. E-books and navigators that allow software updates or map downloads via an SD card. Additionally, the bootable SD card can be used for testing, training, or DIY projects and prototypes.
Launching recovery software
Bootable SD cards can be used to restore functionality if the system becomes unbootable or unstable. You can write software to restore damaged system files, an antivirus, or a utility for working with a hard drive onto an SD card.
Disfunction of USB ports/optical drive
Perhaps this situation will arise for very few people, but theoretically it can happen. Namely, when the only way to interact with the device can only be through the SD slot. This is where a prepared bootable SD card will come to the rescue, ready to make the device working again.
SD card options for creating bootable media
To successfully create a boot card, you need to take into account several nuances:
• The card must have a capacity larger than the size of the operating system image files.
• The SD card must be formatted with a file system compatible with the operating system being loaded. When working with classic operating systems, FAT32 or exFAT is usually used; when working with mobile devices, in some cases DOS is needed.
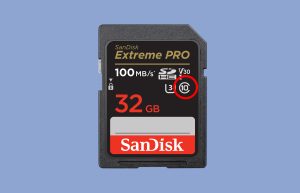
• Card loading time is directly related to read and write speed. Ideally, use cards with speed class 10 or higher, which guarantees write speeds of at least 10 MB/s. UHS (Ultra High Speed) cards will offer even higher performance. Classes are usually depicted directly on the surface of the map. Look for a symbol that resembles the outline of the letter “C” with a number in the center – this is the speed class indicator.
• As we wrote above, when working with a PC, check in advance (if possible) whether it recognizes your card in the BIOS/UEFI or not. It is recommended to place the memory card in the appropriate slot of the reader and check its recognition through the BIOS interface in order to eliminate doubts. This will be discussed in more detail at the end of the article.
How to make an SD card bootable? Software overview
Creating a bootable SD card is the process of burning an operating system image (most often in ISO format) onto its partitions so that you can run the operating system directly from the card. Let’s look at the most popular programs that can help with creating a boot card.
Ventoy
The program has a distinctive feature – in addition to the traditional recording of only one image on an SD card, it is possible to copy several ISO files. An added benefit is that you can select the OS you want right when you boot your computer, making Ventoy an excellent choice for those who want to have multiple operating systems or tools on one SD drive. Ventoy works with most ISO images, including Windows, Linux, macOS, as well as other operating systems such as Android. Moreover, you can even prepare an SD card from your smartphone, because Ventoy has an application.
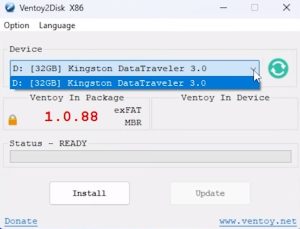
The process begins by launching Ventoy and selecting the appropriate drive in the program interface. After this, Ventoy formats the SD card, creating a special boot partition in it. It is important to ensure the safety of important data on the SD card before starting the procedure, as all data will be destroyed beyond recovery. Once the SD card is prepared, you can simply drag and drop the desired ISO files into the partition created by Ventoy.
Rufus
Rufus is a popular utility for creating bootable media. We talked about it in detail in this article. The main advantage is the simplicity of the interface and the ability to customize the recording process in detail. Rufus also supports a number of additional features, such as creating UEFI-compatible boot drives. Before you start, you need to download Rufus from the official website. You will also need an SD card with enough capacity to accommodate the OS image you plan to install. The ISO file of the operating system itself must also be downloaded in advance. After launching Rufus, insert the SD card into your computer. The application will automatically detect the connected card. It is important to double check that the correct SD is selected. Then specify the path to the ISO image of the operating system.
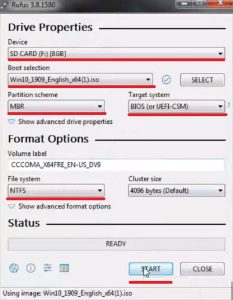
Before clicking ‘Start’, pay attention to the formatting options. Select the file system type and partitioning scheme based on the requirements of the selected OS and hardware capabilities.
Etcher
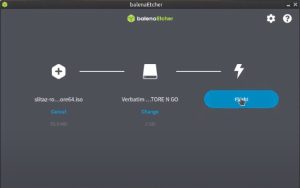
Etcher stands out for its graphical interface and ease of use. The program is focused on one task – writing an image to media, and does it efficiently and reliably. Etcher doesn’t have as many advanced features as other programs, but it is an ideal choice for those who value minimalism and convenience. The program can work with various images, such as ISO, IMG, and is also suitable for use with Raspberry Pi and other single board computers, as it can burn images of operating systems optimized for such devices. Etcher also works with Windows, macOS and Linux. To work, you will need to download and install Etcher from the program’s official website. First of all, you will need an ISO image of the operating system you want to install. The image can be downloaded from the official website of the desired OS. When you launch Etcher, you’ll see a simple interface with intuitive instructions. Select the ISO image you downloaded earlier, thenundefined select the connected SD card. After checking your selection, click the “Flash!” button, and the process of writing the image to the card will begin.
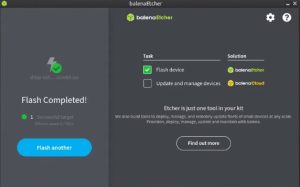
Upon completion, Etcher will check the recorded data to ensure there are no errors. After successful verification, you will receive a notification and your bootable SD card will be ready for use.
How to change your computer settings to boot from an SD card?
We will describe in general the steps required to change the BIOS / UEFI settings and set the device to boot from an SD card. Please note that the process may vary slightly depending on the BIOS/UEFI manufacturer of your device, but in general the steps are the same:
1. Reboot the device and press the special key to enter the BIOS/UEFI settings. Often this is the Delete, F2, F10, F12 or Esc key. The exact key is usually displayed on the screen during boot (for example, “Press F2 to enter Setup”).
If you have any difficulties, see our material with a table of hotkeys for logging in boot menu on different devices.
2. Once in BIOS/UEFI, use the arrow keys to navigate through the menus. Find the section related to download settings. This could be “Boot Options”, “Boot Order”, “Boot Sequence” or something similar.
3. Inside the boot section, select the option that allows you to change the order of boot devices. You may come across a list of devices that can be edited either through a special subsection or directly in this menu.
4. Find the device corresponding to the SD reader. It may be labeled “Removable Device”, “USB Device”, “SD Card” or, if the SD card is inserted into a USB card reader, simply “USB-HDD” or “USB Storage Device”.
5. Use the keys provided in the BIOS/UEFI to move the SD card or corresponding device to the top of the boot device list. Keys may include +, -, F5, F6 or others.
6. After changing the boot device order, confirm the changes and save the settings by exiting the BIOS/UEFI and rebooting the device. Typically this requires pressing F10 or selecting “Save & Exit Setup”.
7. Reboot your device and it will try to boot from the SD card if it has a bootable operating system or other necessary boot files.
We hope this material was useful to you and you will be able to create a boot map without problems if necessary. Write us questions in the comments, we are open for discussions.