
Hi everyone! Today we will talk about the useful Rufus program and show how to use it to create a bootable usb with Windows 11. Rufus is software from developer Pete Batard that offers a simple procedure for transferring a system image (distribution) of the operating system to an external drive, ensuring its subsequent use as a bootable USB for updating or completely installing a new OS.
The first release of the program was released in 2012. Since then the program has been regularly updated with new functionality and translated into more than 30 languages. The program is open source (GPL 3.0) and completely free – Rufus is downloaded at least 3 million times every month. We must pay tribute to the developer, he fundamentally does not make the product paid.
His position is: “I believe it is better to try to benefit millions of users by providing a free application, rather than a few thousand with a paid one.”
Gratitude in the form of a donation are accepted into a special fund of Free Software. This position at least deserves respect.

What people love about Rufus is its simplicity – the program does not distract you with unnecessary information. The entire interface is focused on the main task – writing ISO images to a flash drive, without unnecessary steps or other actions. The program works on a principle similar to our WinUSB and Media Creation Tool from Microsoft. Distinctive features of Rufus are such capabilities as working with other operating systems (for example, Linux), working with various partitions (GPT/MBR), creating a bootable device with Windows to Go – a disk from which Windows is not installed, but directly launched and many other features.
More detailed functionality and an overview of Rufus can be found in this material.
We’ll move on to the main topic, which is how to use Rufus to download an ISO file and create a bootable device for installing Windows 11 (versions 21H2 and newer).
Preparing for installation
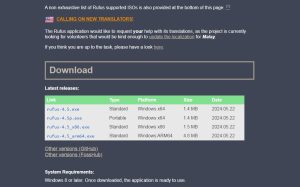
So, before you start, you need to prepare a USB drive with at least 8GB capacity. In addition, we will need Rufus itself; you can download the latest available version of the program on the official website of the program. Please note that the program only works with versions of Windows 8 and higher.
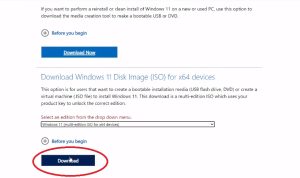
We also need a Windows 11 ISO image file. You can download it from the official Microsoft website or select the option to download it directly in the Rufus program, which is also very convenient.
Start installation and configure parameters in Rufus
2.1 Insert the USB drive into your computer.
2.2 Launch Rufus. Find your drive in the list of devices in the “Device” field

2.3 Click on the “Select” button next to “Boot Image” and specify the location of your Windows 11 ISO file.
2.4 In the “Image option field” select the standard Windows installation option.
2.5 In the “Partitition scheme” field, select “GPT” if you have a modern computer with UEFI or “MBR” for older devices with BIOS.
If you’re having trouble with this step and want to understand what settings are being used on your computer, you’ll need to check your system settings. Find the hard drive and see whether it is labeled “GPT” or “MBR”. This can be seen in the disk properties under “Volume Information”. “GPT” is used in newer UEFI-enabled computers and has several advantages over “MBR”, including support for larger disks and more partitions.”MBR” is used in older systems with BIOS and is limited to a disk size of up to 2 TB and the number of primary partitions to four.

2.6 File System: It is recommended to use “NTFS” for Windows 11. Cluster size: Leave the default value. In field undefined “Quick format” can be checked, as in “Create extended label and icon files) In the “Volume Label” field, you can enter a name for your USB drive (for example, “Windows 11”).
2.7 Once you complete the setup and click “START”, you may receive pop-up messages with additional options.
Check the “Remove 4GB+ RAM, Secure Boot and TPM 2.0 requirements” checkbox to bypass Windows 11 hardware requirements.
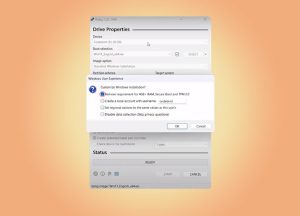
Check the “Remove Microsoft online account requirement” checkbox to be able to create a local account while running (OOBE). This feature was intended as a way to bring back a feature native to Windows 11 21H2, but later removed by Microsoft in version 22H2.
Hence, this particular setting is only offered when you are running a Windows 11 22H2 or later image in Rufus. If you are using a Windows 11 21H2 image, Rufus will naturally not offer you this feature, because the necessary option is already built into this version!
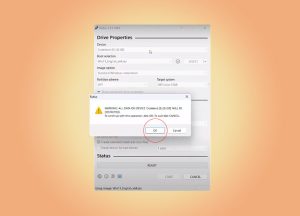
Confirm that all data on the drive can be destroyed before burning the image to a USB drive. Click “OK” if you didn’t forget to copy something from your flash drive important.
2.8 Great! Rufus will begin the process of formatting the USB drive, and then writing the Windows 11 distribution files. Once completed, you will receive a ready-made bootable USB drive.
Reboot and install Windows 11
3.1 Restart your computer and enter the BIOS or UEFI to change the boot order to give priority to the USB drive. See how to enter BIOS/UEFI on devices from different manufacturers.
3.2 Save the changes and reboot the system. The computer should boot from the USB drive and the Windows 11 installation process will begin
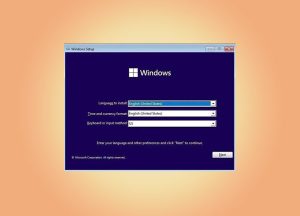
3.3 Follow the installation instructions, selecting your preferred options and waiting for the process to complete.
In conclusion
Creating a bootable device using Rufus is a convenient and fast way to install Windows 11, especially for experts and users who prefer more control over the installation process. To get the best results when creating a bootable flash drive from Rufus, you should always try to use undefined it with a genuine, unmodified retail Windows ISO image, since these are the only images that the program officially supports.